WPF中MVVM模式的实践与应用
1. MVVM模式概述
MVVM(Model-View-ViewModel)是一种软件架构设计模式,由微软的WPF和Silverlight架构师John Gossman于2005年首次提出。它旨在帮助开发者在用户界面(UI)开发中实现关注点分离,提升代码的可维护性和可测试性。
在WPF应用中采用MVVM模式,通常可以带来以下核心优势:
- UI与业务逻辑解耦: 彻底分离了用户界面(View)和应用程序的业务逻辑(ViewModel),使得View成为ViewModel的纯粹消费者。
- 职责清晰: 有助于明确区分哪些是UI呈现和交互操作,哪些是核心业务逻辑,避免职责混淆。
- 降低耦合度: 各层之间相互依赖程度降低,符合面向对象设计原则,提高了代码的灵活性和可重用性。
- 易于测试: ViewModel层不依赖于具体的UI框架,可以独立进行单元测试,从而提高测试效率和覆盖率。
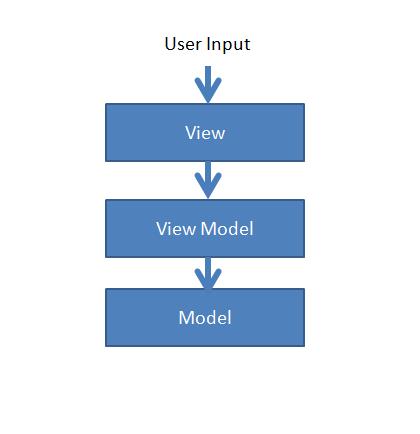
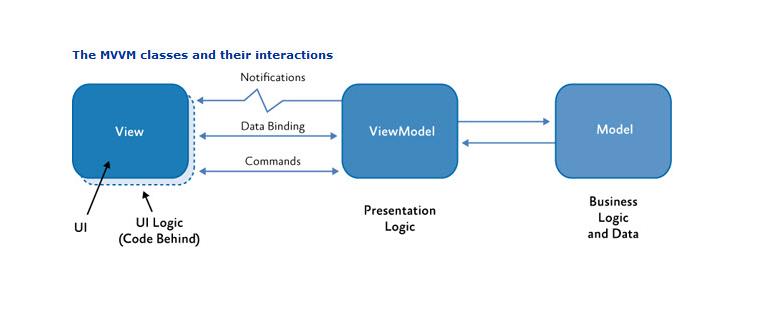
MVVM模式的结构通常可以通过下图来表示:
2. MVVM模式实践:计数器示例
接下来,我们将通过一个简单的计数器应用来演示如何在WPF中实现MVVM模式。
2.1 数据模型(Model)定义
首先,创建数据模型。这个模型将包含我们应用程序的数据和基本的业务逻辑。在本例中,我们创建一个CounterModel来存储一个整数值,并提供一个方法来增加这个值。由于WPF的UI需要感知数据的变化,所以CounterModel必须实现INotifyPropertyChanged接口。
在项目根目录创建Models文件夹,并添加CounterModel.cs文件:
using System.ComponentModel;
using System.Runtime.CompilerServices;

namespace MvvmExample.Models
{
    public class CounterModel : INotifyPropertyChanged
    {
        private int _currentCount;

        public int CurrentCount
        {
            get { return _currentCount; }
            set
            {
                if (_currentCount != value)
                {
                    _currentCount = value;
                    OnPropertyChanged();
                }
            }
        }

        public CounterModel()
        {
            _currentCount = 0; // 初始值为0
        }

        public void Increment()
        {
            CurrentCount++; // 增加计数
        }

        public event PropertyChangedEventHandler PropertyChanged;

        protected virtual void OnPropertyChanged([CallerMemberName] string propertyName = null)
        {
            PropertyChanged?.Invoke(this, new PropertyChangedEventArgs(propertyName));
        }
    }
}
2.2 命令(Command)实现
在MVVM模式中,View中的交互(如按钮点击)通常通过Command绑定到ViewModel中的逻辑。为了实现这一点,我们需要一个实现了ICommand接口的通用命令类,通常称为RelayCommand或DelegateCommand。
在项目根目录创建Commands文件夹,并添加RelayCommand.cs文件:
using System;
using System.Windows.Input;

namespace MvvmExample.Commands
{
    public class RelayCommand : ICommand
    {
        private readonly Action<object> _execute;
        private readonly Func<object, bool> _canExecute;

        public event EventHandler CanExecuteChanged
        {
            add { CommandManager.RequerySuggested += value; }
            remove { CommandManager.RequerySuggested -= value; }
        }

        public RelayCommand(Action<object> execute, Func<object, bool> canExecute = null)
        {
            _execute = execute ?? throw new ArgumentNullException(nameof(execute));
            _canExecute = canExecute;
        }

        public bool CanExecute(object parameter)
        {
            return _canExecute == null || _canExecute(parameter);
        }

        public void Execute(object parameter)
        {
            _execute(parameter);
        }

        // 可以手动触发CanExecuteChanged事件
        public void RaiseCanExecuteChanged()
        {
            CommandManager.InvalidateRequerySuggested();
        }
    }
}
2.3 视图模型(ViewModel)定义
ViewModel是View和Model之间的桥梁。它负责封装Model数据以供View展示,并提供View可以绑定的命令和属性。它不直接引用View,而是通过数据绑定和命令机制与View通信。
在项目根目录创建ViewModels文件夹,并添加CounterViewModel.cs文件:
using MvvmExample.Commands;
using MvvmExample.Models;
using System.Windows.Input;

namespace MvvmExample.ViewModels
{
    public class CounterViewModel
    {
        public CounterModel CurrentCounter { get; set; }
        public ICommand IncrementCountCommand { get; set; }

        public CounterViewModel()
        {
            CurrentCounter = new CounterModel();
            IncrementCountCommand = new RelayCommand(ExecuteIncrementCount, CanExecuteIncrementCount);
        }

        private void ExecuteIncrementCount(object obj)
        {
            CurrentCounter.Increment();
        }

        private bool CanExecuteIncrementCount(object obj)
        {
            // 例如,可以添加逻辑限制计数器的最大值
            // return CurrentCounter.CurrentCount < 100;
            return true;
        }
    }
}
2.4 视图(View)构建
最后,创建View,它是一个WPF用户界面。View负责展示数据,并通过数据绑定(Data Binding)与ViewModel进行连接。它将ViewModel的属性绑定到UI元素上,并将用户操作(如按钮点击)绑定到ViewModel的Command上。
MainWindow.xaml
修改MainWindow.xaml文件,使其绑定到CounterViewModel:
<Window x:Class="MvvmExample.MainWindow"
        xmlns="http://schemas.microsoft.com/winfx/2006/xaml/presentation"
        xmlns:x="http://schemas.microsoft.com/winfx/2006/xaml"
        xmlns:d="http://schemas.microsoft.com/expression/blend/2008"
        xmlns:mc="http://schemas.openxmlformats.org/markup-compatibility/2006"
        xmlns:local="clr-namespace:MvvmExample"
        xmlns:vm="clr-namespace:MvvmExample.ViewModels"
        mc:Ignorable="d"
        Title="MVVM计数器示例" Height="250" Width="350">
    <Window.Resources>
        <vm:CounterViewModel x:Key="CounterVM"/>
    </Window.Resources>
    <Grid DataContext="{StaticResource CounterVM}">
        <StackPanel VerticalAlignment="Center" HorizontalAlignment="Center">
            <TextBlock Text="当前计数:" FontSize="24" Margin="0,0,0,10"/>
            <TextBlock Text="{Binding CurrentCounter.CurrentCount}"
                       FontSize="48" FontWeight="Bold"
                       HorizontalAlignment="Center" Margin="0,0,0,20"/>
            <Button Content="增加计数"
                    Command="{Binding IncrementCountCommand}"
                    Width="150" Height="40" FontSize="18"/>
        </StackPanel>
    </Grid>
</Window>
MainWindow.xaml.cs
在MainWindow.xaml.cs中,我们将DataContext设置为CounterViewModel的一个实例。这使得WPF的数据绑定机制能够找到ViewModel中定义的属性和命令。
using System.Windows;

namespace MvvmExample
{
    /// <summary>
    /// MainWindow.xaml 的交互逻辑
    /// </summary>
    public partial class MainWindow : Window
    {
        public MainWindow()
        {
            InitializeComponent();
            // 在XAML中已经通过 <Window.Resources> 设置了DataContext
            // this.DataContext = new ViewModels.CounterViewModel();
        }
    }
}
通过以上步骤,我们就完成了一个遵循MVVM模式的WPF计数器应用。当点击"增加计数"按钮时,View会通过绑定的IncrementCountCommand调用ViewModel中的ExecuteIncrementCount方法,进而修改Model中的CurrentCount。由于Model实现了INotifyPropertyChanged,CurrentCount的改变会自动通知到ViewModel,并最终更新到View上的TextBlock。
