GIMP Python 插件开发:实现批量生成参考线与图像自动等分切割
批量生成均匀参考线
在 GIMP 中处理大型图像或进行网页切图时,经常需要添加大量等距的参考线。通过 Python-Fu 脚本,我们可以编写一个插件来自动计算并生成水平或垂直的均匀参考线。以下脚本会清除指定方向上的旧参考线,并根据用户设定的像素间距重新生成。
#!/usr/bin/env python2
# -*- coding: utf-8 -*-

from gimpfu import *

def generate_uniform_guides(image, drawable, axis, interval):
    width = image.width
    height = image.height

    is_horizontal = (axis == 0)

    if is_horizontal:
        if interval >= height:
            gimp.message("Spacing must be less than image height.")
            return
        limit = height
        add_guide_func = pdb.gimp_image_add_hguide
    else:
        if interval >= width:
            gimp.message("Spacing must be less than image width.")
            return
        limit = width
        add_guide_func = pdb.gimp_image_add_vguide

    # 清除同方向上的现有参考线
    guide_id = pdb.gimp_image_find_next_guide(image, 0)
    while guide_id != 0:
        next_guide_id = pdb.gimp_image_find_next_guide(image, guide_id)
        guide_axis = pdb.gimp_image_get_guide_orientation(image, guide_id)
        if (is_horizontal and guide_axis == ORIENTATION_HORIZONTAL) or \
           (not is_horizontal and guide_axis == ORIENTATION_VERTICAL):
            pdb.gimp_image_delete_guide(image, guide_id)
        guide_id = next_guide_id

    # 按指定间距添加新参考线
    current_pos = interval
    while current_pos < limit:
        add_guide_func(image, current_pos)
        current_pos += interval

register(
    "python_fu_generate_uniform_guides",
    "Generate uniform guides across the image",
    "Creates multiple horizontal or vertical guides with a specified spacing",
    "Developer",
    "Developer",
    "2023",
    "<Image>/Image/Guides/Generate Uniform Guides...",
    "*",
    [
        (PF_IMAGE, "image", "Input image", None),
        (PF_DRAWABLE, "drawable", "Input drawable", None),
        (PF_OPTION, "axis", "Direction", 0, ["Horizontal", "Vertical"]),
        (PF_INT, "interval", "Spacing (pixels)", 500)
    ],
    [],
    generate_uniform_guides
)

main()
图像自动等分切割
在生成参考线的基础上,我们可以进一步实现图像的自动切割功能。该脚本将参考线生成逻辑与图像裁剪导出逻辑相结合。它会根据设定的间距自动生成参考线,读取参考线坐标,然后将图像分割成多个子图并保存到指定目录。
#!/usr/bin/env python2
# -*- coding: utf-8 -*-

import os
from gimpfu import *

gettext.install("gimp20-python", gimp.locale_directory, unicode=True)

def generate_uniform_guides(image, axis, interval):
    width, height = image.width, image.height
    is_horizontal = (axis == 0)

    limit = height if is_horizontal else width
    if interval >= limit:
        return

    add_guide_func = pdb.gimp_image_add_hguide if is_horizontal else pdb.gimp_image_add_vguide

    guide_id = pdb.gimp_image_find_next_guide(image, 0)
    while guide_id != 0:
        next_id = pdb.gimp_image_find_next_guide(image, guide_id)
        guide_axis = pdb.gimp_image_get_guide_orientation(image, guide_id)
        if (is_horizontal and guide_axis == ORIENTATION_HORIZONTAL) or \
           (not is_horizontal and guide_axis == ORIENTATION_VERTICAL):
            pdb.gimp_image_delete_guide(image, guide_id)
        guide_id = next_id

    pos = interval
    while pos < limit:
        add_guide_func(image, pos)
        pos += interval

class GuideIterator:
    def __init__(self, img):
        self.img = img
        self.current = 0

    def __iter__(self):
        return iter(self._get_next, 0)

    def _get_next(self):
        self.current = self.img.find_next_guide(self.current)
        return self.current

def extract_guide_coordinates(img):
    v_coords = []
    h_coords = []

    for g_id in GuideIterator(img):
        g_dir = img.get_guide_orientation(g_id)
        g_pos = img.get_guide_position(g_id)

        if g_pos > 0:
            if g_dir == ORIENTATION_VERTICAL and g_pos < img.width:
                v_coords.append((g_pos, g_id))
            elif g_dir == ORIENTATION_HORIZONTAL and g_pos < img.height:
                h_coords.append((g_pos, g_id))

    v_coords.sort(key=lambda x: x[0])
    h_coords.sort(key=lambda x: x[0])

    return [v[1] for v in v_coords], [h[1] for h in h_coords]

def crop_and_save_segment(img, layer, out_dir, base_name, ext, left, right, top, bottom, row, col):
    file_name = "%s_r%d_c%d.%s" % (base_name, row, col, ext)
    full_path = os.path.join(out_dir, file_name)

    if not layer:
        temp_img = img.duplicate()
        temp_layer = temp_img.active_layer
    else:
        if img.base_type == INDEXED:
            orig_layer = img.active_layer
            img.active_layer = layer
            temp_img = img.duplicate()
            temp_layer = temp_img.active_layer
            img.active_layer = orig_layer
            temp_img.disable_undo()
            while len(temp_img.layers) > 1:
                if temp_img.layers[0] != temp_layer:
                    pdb.gimp_image_remove_layer(temp_img, temp_img.layers[0])
                else:
                    pdb.gimp_image_remove_layer(temp_img, temp_img.layers[1])
        else:
            temp_img = pdb.gimp_image_new(layer.width, layer.height, img.base_type)
            temp_layer = pdb.gimp_layer_new_from_drawable(layer, temp_img)
            temp_img.insert_layer(temp_layer)

    temp_img.disable_undo()
    temp_img.crop(right - left, bottom - top, left, top)

    if ext == "gif" and temp_img.base_type == RGB:
        pdb.gimp_image_convert_indexed(temp_img, CONVERT_DITHER_NONE, CONVERT_PALETTE_GENERATE, 255, True, False, False)
    if ext == "jpg" and temp_img.base_type == INDEXED:
        pdb.gimp_image_convert_rgb(temp_img)

    pdb.gimp_file_save(temp_img, temp_layer, full_path, full_path)
    gimp.delete(temp_img)

def auto_slice_image(image, drawable, axis, interval, save_dir, base_name, ext):
    generate_uniform_guides(image, axis, interval)
    vert_guides, horz_guides = extract_guide_coordinates(image)

    if not vert_guides and not horz_guides:
        return

    save_dir = os.path.abspath(save_dir)
    if not os.path.exists(save_dir):
        os.makedirs(save_dir)
    elif not os.path.isdir(save_dir):
        save_dir = os.path.dirname(save_dir)

    gimp.progress_init(_("Slicing Image..."))
    total_steps = (len(horz_guides) + 1) * (len(vert_guides) + 1)
    step_val = 1.0 / total_steps
    progress = 0.0

    top_y = 0
    for i in range(len(horz_guides) + 1):
        bottom_y = image.height if i == len(horz_guides) else image.get_guide_position(horz_guides[i])

        left_x = 0
        for j in range(len(vert_guides) + 1):
            right_x = image.width if j == len(vert_guides) else image.get_guide_position(vert_guides[j])

            crop_and_save_segment(image, None, save_dir, base_name, ext, left_x, right_x, top_y, bottom_y, i, j)
            left_x = right_x

            progress += step_val
            gimp.progress_update(progress)

        top_y = bottom_y

register(
    "python_fu_auto_slice_image",
    "Equally slice image based on interval",
    "Automatically generates guides and slices the image into equal parts",
    "Developer",
    "Developer",
    "2023",
    _("<Image>/Filters/Web/Auto Slice..."),
    "*",
    [
        (PF_IMAGE, "image", "Input image", None),
        (PF_DRAWABLE, "drawable", "Input drawable", None),
        (PF_OPTION, "axis", "Direction", 0, ["Horizontal", "Vertical"]),
        (PF_INT, "interval", "Slice size (pixels)", 500),
        (PF_DIRNAME, "save_dir", _("Output directory"), os.getcwd()),
        (PF_STRING, "base_name", _("File prefix"), "slice"),
        (PF_RADIO, "ext", _("Format"), "png", (("gif", "gif"), ("jpg", "jpg"), ("png", "png")))
    ],
    [],
    auto_slice_image,
    domain=("gimp20-python", gimp.locale_directory)
)

main()
插件安装与目录配置
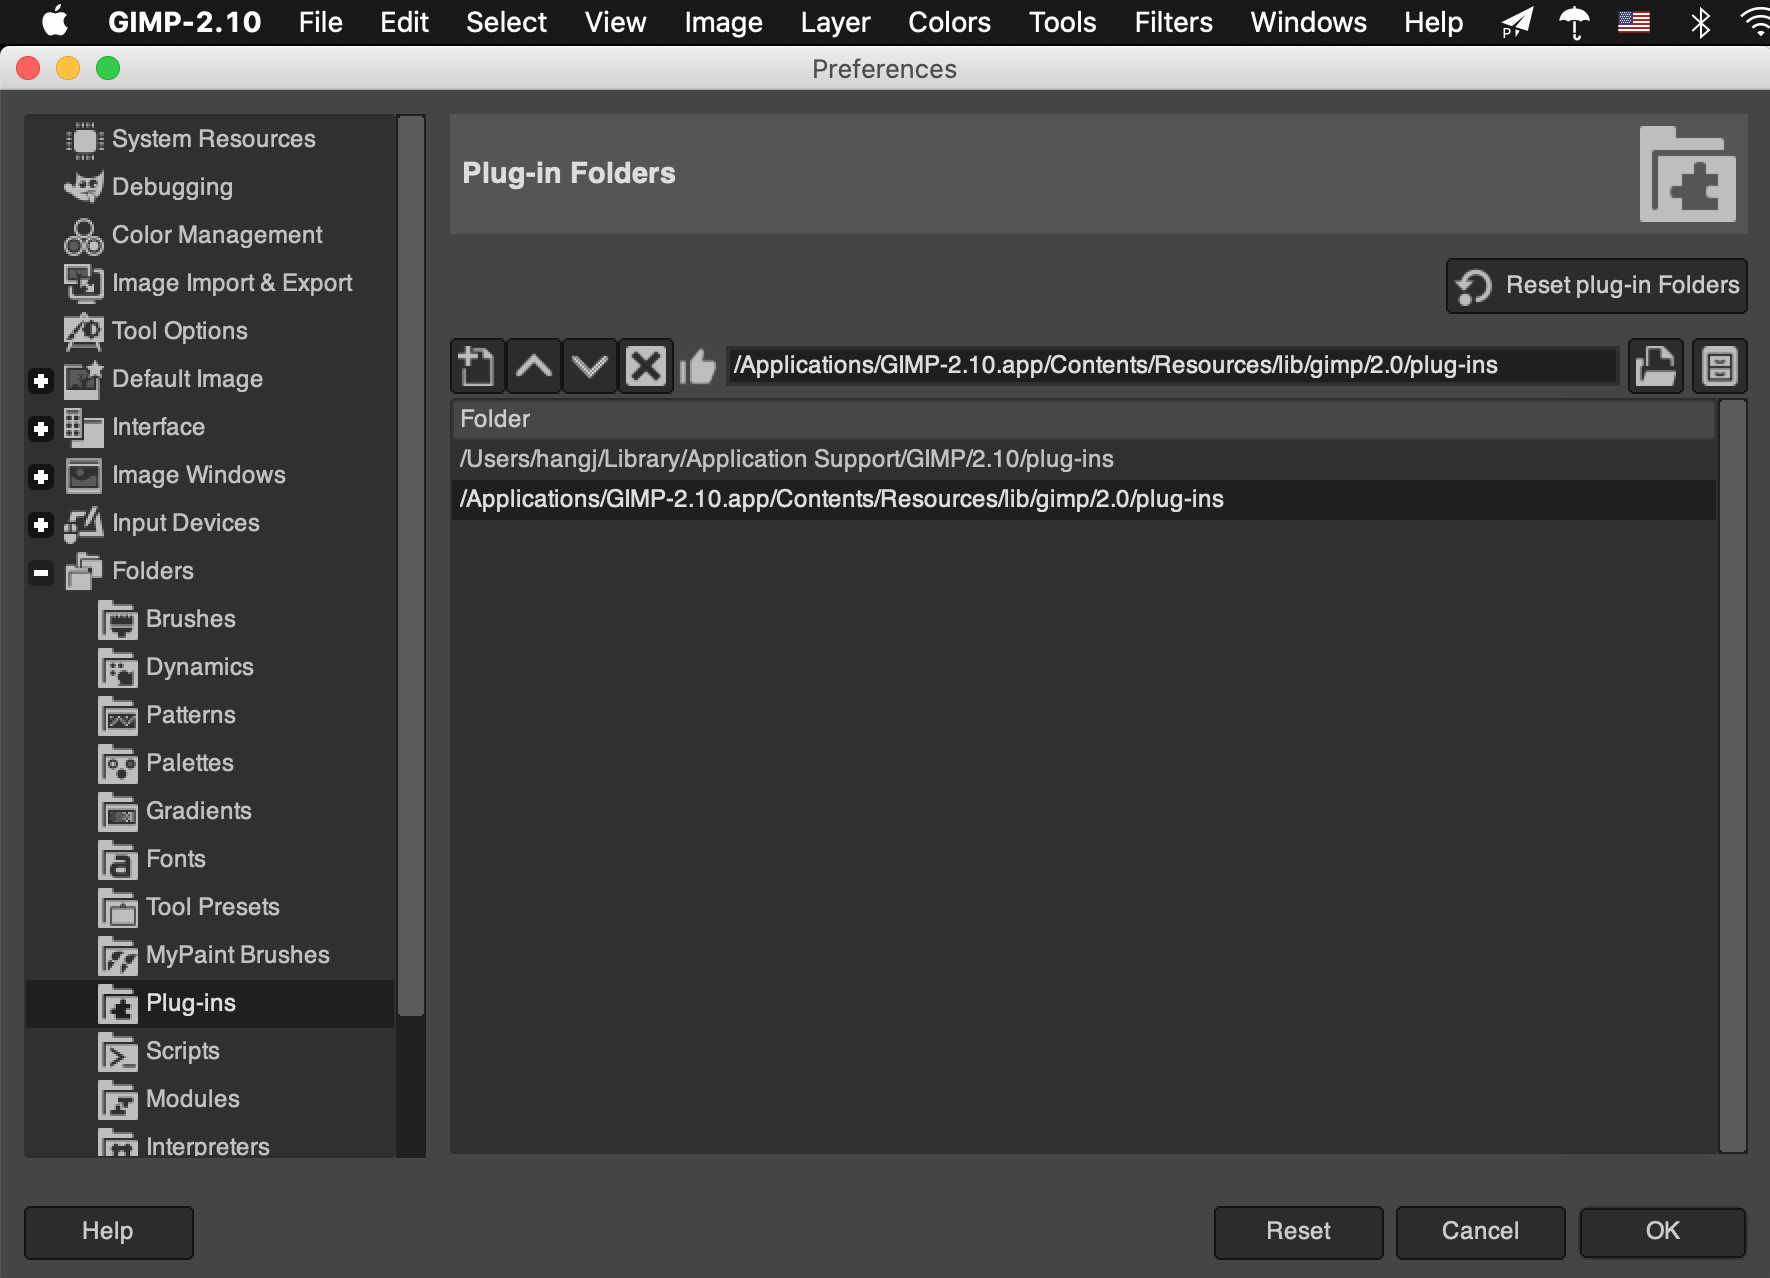
将上述 Python 脚本保存为 .py 文件,并放入 GIMP 的 plug-ins 目录中。在 Linux 或 macOS 系统下,需要通过终端执行 chmod +x filename.py 赋予脚本可执行权限。重启 GIMP 后,插件即可生效。
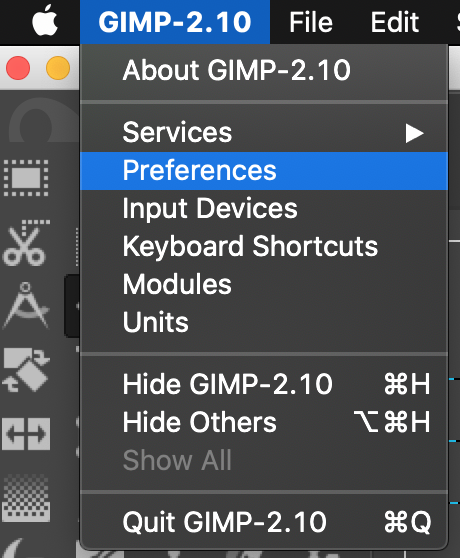
可以通过 GIMP 的首选项设置来确认或修改当前的插件目录路径:
配置快捷键
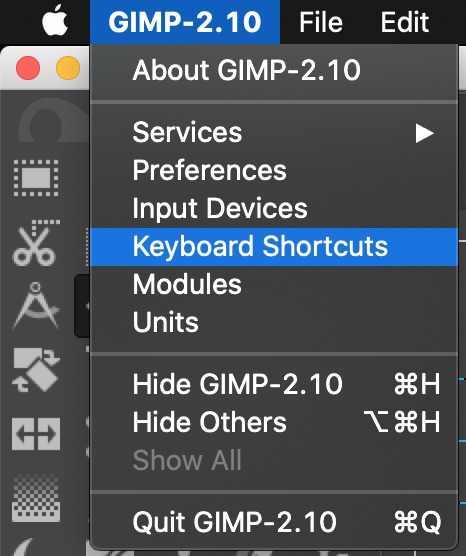
为了提高工作效率,可以为新安装的脚本分配键盘快捷键。进入 GIMP 的"编辑" -> "键盘快捷键"菜单:
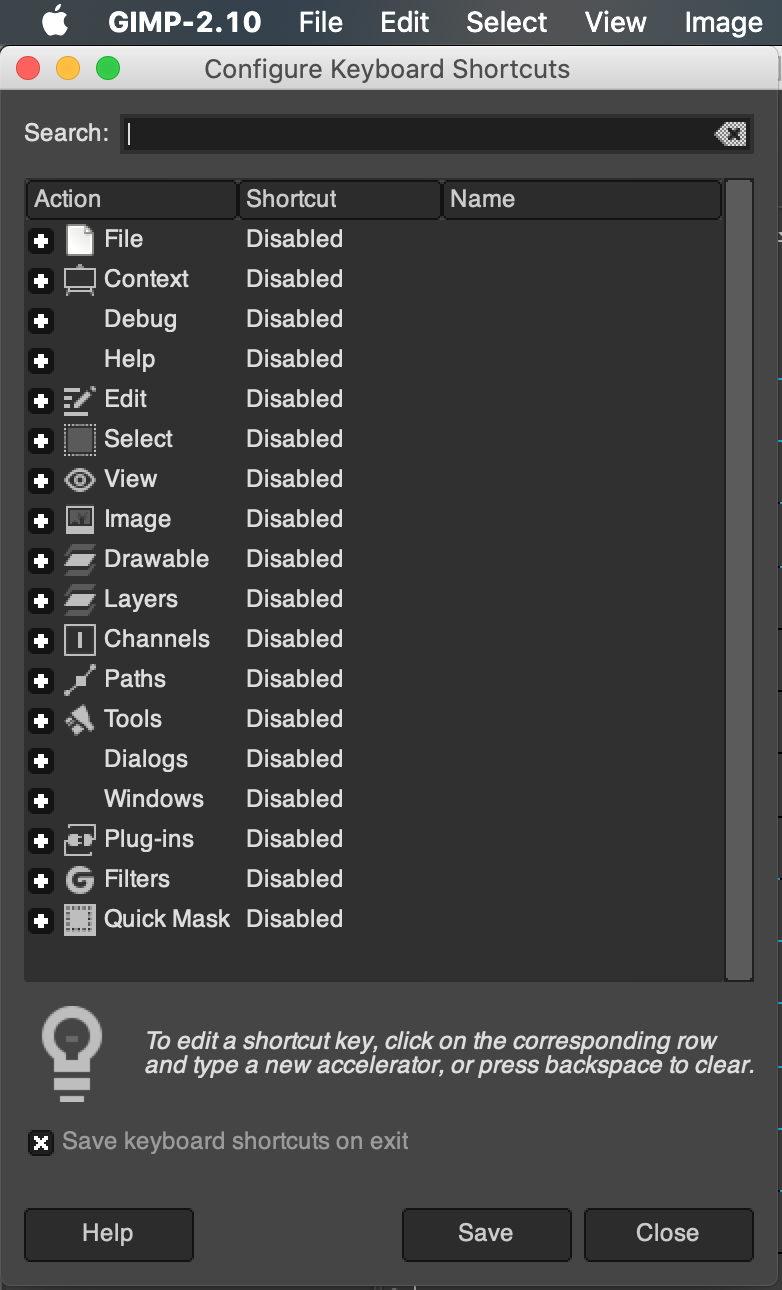
在搜索框中输入脚本的注册名称(例如 slice 或 guides)来定位对应的功能:
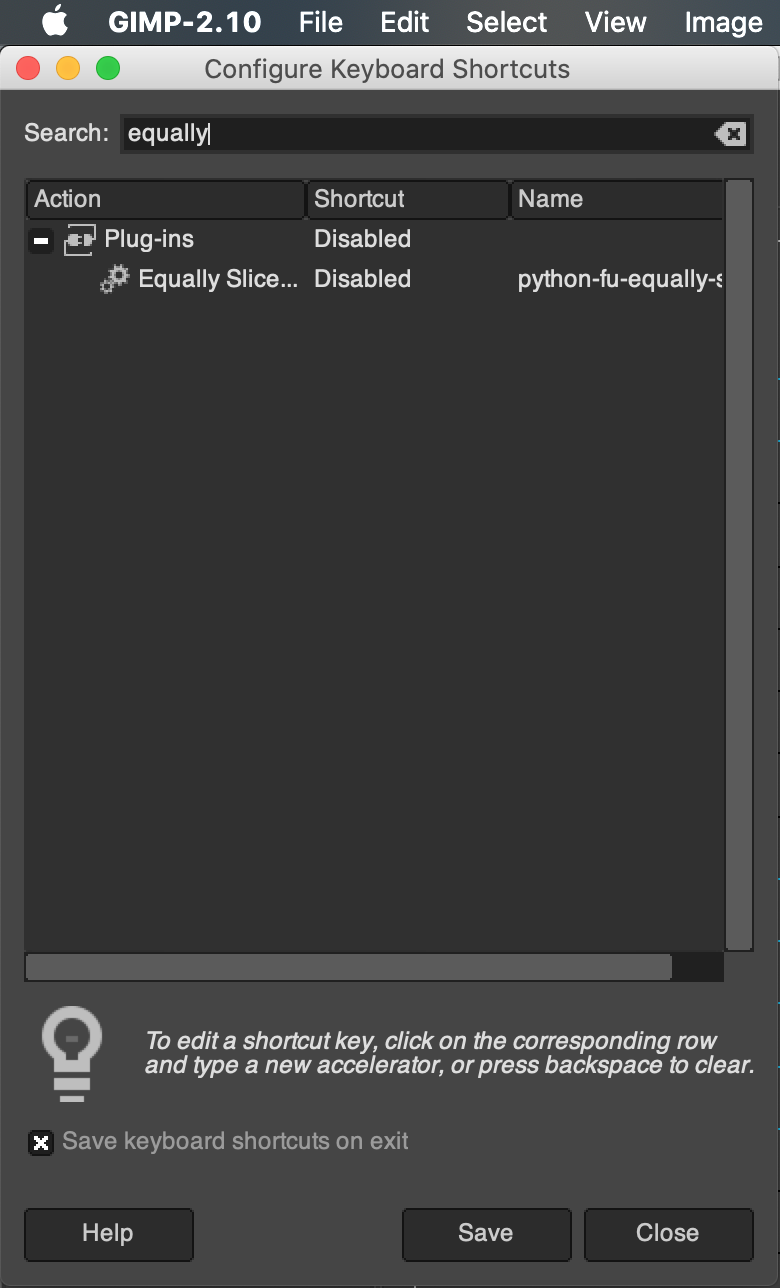
选中目标动作后,按下期望的快捷键组合即可完成绑定。
