基于TensorFlow实现中文文本情感分类系统
系统架构概述
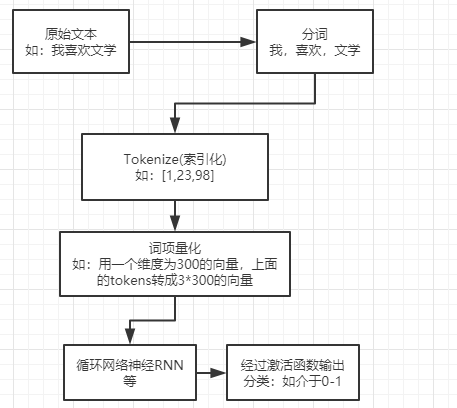
整体处理流程包括数据预处理、特征工程、模型构建等关键环节:
预训练词向量的集成
利用开源中文词向量库构建语义表示层:https://github.com/Embedding/Chinese-Word-Vectors/
from gensim.models import KeyedVectors
# 加载知乎语料预训练的双元语法词向量
vector_model = KeyedVectors.load_word2vec_format('models/zh_word_vectors.bin', binary=False)
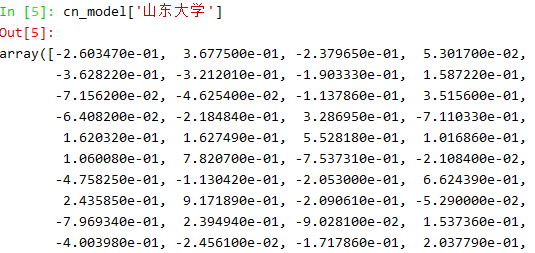
验证词向量维度和语义关系:
# 查询单个词汇的向量表示
sample_vector = vector_model['优秀']
print(f"向量维度: {sample_vector.shape}")

# 计算词汇间语义相似度
similarity = vector_model.similarity('酒店', '宾馆')
print(f"语义相似度: {similarity}")

# 获取最相似词汇列表
similar_words = vector_model.most_similar('服务', topn=5)
print(similar_words)
数据集构建与预处理
采用谭松波酒店评论数据集,包含4000条标注样本(2000正面/2000负面),每条独立存储。
import os
import re
import jieba
import numpy as np
from sklearn.model_selection import train_test_split

def load_dataset(base_path):
    """加载并整合正负样本数据"""
    documents = []
    labels = []

    # 加载正面样本
    pos_files = os.listdir(os.path.join(base_path, 'positive'))
    for filename in pos_files:
        with open(os.path.join(base_path, 'positive', filename), 'r', encoding='utf-8') as f:
            content = f.read().strip()
            if content:
                documents.append(content)
                labels.append(1)

    # 加载负面样本
    neg_files = os.listdir(os.path.join(base_path, 'negative'))
    for filename in neg_files:
        with open(os.path.join(base_path, 'negative', filename), 'r', encoding='utf-8') as f:
            content = f.read().strip()
            if content:
                documents.append(content)
                labels.append(0)

    return documents, np.array(labels)

corpus, sentiment_labels = load_dataset('data/hotel_reviews')
文本数字化处理
执行分词、清洗和序列化操作:
def tokenize_texts(texts, vocab_model):
    """将文本转换为数字索引序列"""
    processed_sequences = []

    for text in texts:
        # 清理非文本字符
        cleaned = re.sub(r'[^\u4e00-\u9fa5a-zA-Z0-9]', '', text)

        # 执行中文分词
        segmented = list(jieba.cut(cleaned))

        # 词汇索引映射
        indexed_sequence = []
        for word in segmented:
            try:
                idx = vocab_model.key_to_index[word]
                indexed_sequence.append(idx)
            except KeyError:
                indexed_sequence.append(0)  # 未知词标记

        processed_sequences.append(indexed_sequence)

    return processed_sequences

tokenized_corpus = tokenize_texts(corpus, vector_model)
序列长度标准化策略
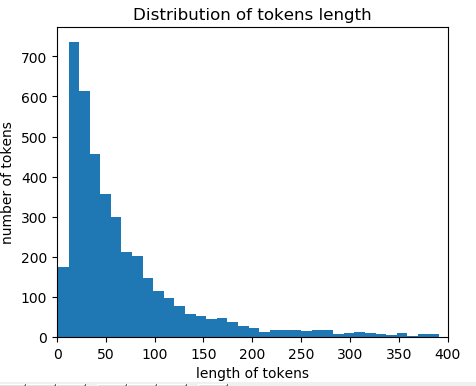
分析序列长度分布,确定最优序列长度:
import matplotlib.pyplot as plt

# 统计序列长度分布
seq_lengths = [len(seq) for seq in tokenized_corpus]

plt.figure(figsize=(10, 6))
plt.hist(seq_lengths, bins=50, alpha=0.7)
plt.xlabel('序列长度')
plt.ylabel('样本数量')
plt.title('文本序列长度分布')
plt.grid(True)
plt.show()

# 计算最佳截断长度
mean_length = np.mean(seq_lengths)
std_length = np.std(seq_lengths)
optimal_length = int(mean_length + 2 * std_length)

coverage_ratio = np.sum(np.array(seq_lengths) < optimal_length) / len(seq_lengths)
print(f"建议截断长度: {optimal_length}")
print(f"覆盖率: {coverage_ratio:.2%}")
词向量矩阵初始化
构建符合Keras Embedding层要求的词向量矩阵:
def create_embedding_matrix(vocab_model, vocab_size=50000, embed_dim=300):
    """构建词汇-向量映射矩阵"""
    embedding_weights = np.zeros((vocab_size, embed_dim), dtype=np.float32)

    for idx in range(vocab_size):
        word = vocab_model.index_to_key[idx]
        embedding_weights[idx] = vocab_model[word]

    return embedding_weights

# 生成词向量矩阵
VOCAB_SIZE = 50000
EMBEDDING_DIM = 300
embedding_weights = create_embedding_matrix(vector_model, VOCAB_SIZE, EMBEDDING_DIM)

# 验证矩阵正确性
verification_word = vector_model.index_to_key[123]
is_valid = np.allclose(vector_model[verification_word], embedding_weights[123])
print(f"词向量矩阵验证: {is_valid}")

序列对齐处理
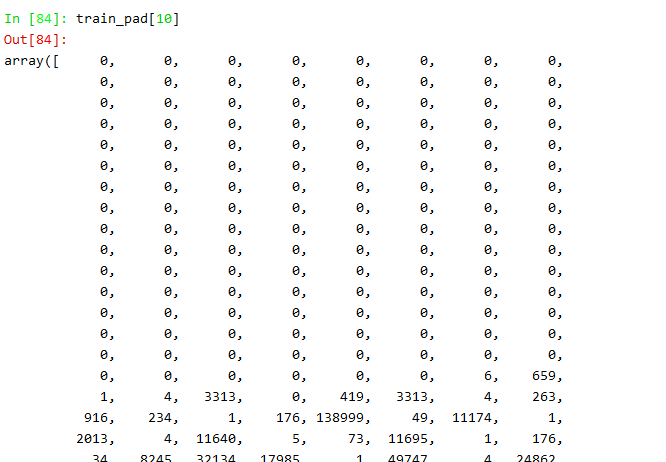
执行填充和截断操作以统一序列长度:
from tensorflow.keras.preprocessing.sequence import pad_sequences

def normalize_sequences(sequences, max_length):
    """统一序列长度处理"""
    return pad_sequences(
        sequences,
        maxlen=max_length,
        padding='pre',
        truncating='pre',
        dtype='int32'
    )

# 应用序列标准化
padded_sequences = normalize_sequences(tokenized_corpus, optimal_length)
print(f"处理前样本形状: {len(tokenized_corpus)}")
print(f"处理后矩阵形状: {padded_sequences.shape}")
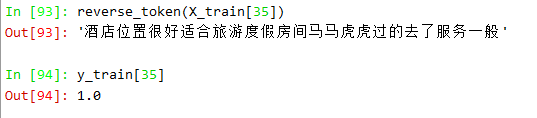
训练集与验证集划分
# 数据集分割
X_train, X_val, y_train, y_val = train_test_split(
    padded_sequences,
    sentiment_labels,
    test_size=0.1,
    random_state=42,
    stratify=sentiment_labels  # 保持类别比例
)

print(f"训练集大小: {X_train.shape[0]}")
print(f"验证集大小: {X_val.shape[0]}")
print(f"正负样本比例 - 训练集: {np.mean(y_train):.2f}")
print(f"正负样本比例 - 验证集: {np.mean(y_val):.2f}")
LSTM情感分析模型构建
设计包含Embedding、LSTM和Dense层的神经网络架构:
from tensorflow.keras.models import Sequential
from tensorflow.keras.layers import Embedding, LSTM, Dense, Dropout
from tensorflow.keras.optimizers import Adam
from tensorflow.keras.callbacks import EarlyStopping

def build_sentiment_model(vocab_size, embed_dim, embed_matrix, seq_length):
    """构建情感分析模型"""
    model = Sequential([
        # 词嵌入层(使用预训练权重)
        Embedding(
            input_dim=vocab_size,
            output_dim=embed_dim,
            input_length=seq_length,
            weights=[embed_matrix],
            trainable=False  # 冻结预训练权重
        ),

        # LSTM特征提取层
        LSTM(128, dropout=0.3, recurrent_dropout=0.3, return_sequences=False),

        # 全连接分类层
        Dense(64, activation='relu'),
        Dropout(0.5),
        Dense(1, activation='sigmoid')
    ])

    # 编译模型
    model.compile(
        optimizer=Adam(learning_rate=0.001),
        loss='binary_crossentropy',
        metrics=['accuracy']
    )

    return model

# 实例化模型
sentiment_classifier = build_sentiment_model(
    VOCAB_SIZE,
    EMBEDDING_DIM,
    embedding_weights,
    optimal_length
)

# 模型结构概览
sentiment_classifier.summary()
模型训练与评估
设置训练参数并启动训练过程:
# 训练配置
callbacks = [
    EarlyStopping(
        monitor='val_loss',
        patience=3,
        restore_best_weights=True
    )
]

# 执行训练
training_history = sentiment_classifier.fit(
    X_train,
    y_train,
    validation_data=(X_val, y_val),
    epochs=20,
    batch_size=64,
    callbacks=callbacks,
    verbose=1
)

# 评估模型性能
loss, accuracy = sentiment_classifier.evaluate(X_val, y_val)
print(f"验证集准确率: {accuracy:.4f}")
