构建基于LangChain的多智能体数据处理与可视化系统
引言
在现代复杂的业务环境中,单一的大型语言模型(LLM)往往难以满足多样化的数据处理与分析需求。为了提高系统的适应性和效率,多智能体(Multi-Agent)系统应运而生。本文将基于LangChain框架构建一个多LLM智能体系统,用于处理用户请求、收集数据、生成可视化图表并返回最终结果。我们将实现一个能够查询印度过去五年GDP数据并生成相应图表的复杂系统。
多智能体系统架构
多智能体系统主要由以下关键组件构成:
- 数据采集智能体(Data Collector):负责获取用户所需的数据。通过调用外部搜索引擎或数据库,收集并整理相关信息。
- 任务路由智能体(Task Router):根据当前状态和消息内容,决定信息流向。它是系统的核心控制器,确保各智能体之间的无缝协作。
- 可视化生成智能体(Visualizer):负责将收集到的数据转换为可视化图表,提升数据可理解性。
- 执行工具智能体(Executor):用于执行各种外部工具或脚本,如Python代码执行器,用于数据处理或图表生成。
- 状态管理器(State Manager):维护每个智能体的状态信息,包括消息历史、发送者等,实现跨智能体的上下文记忆。
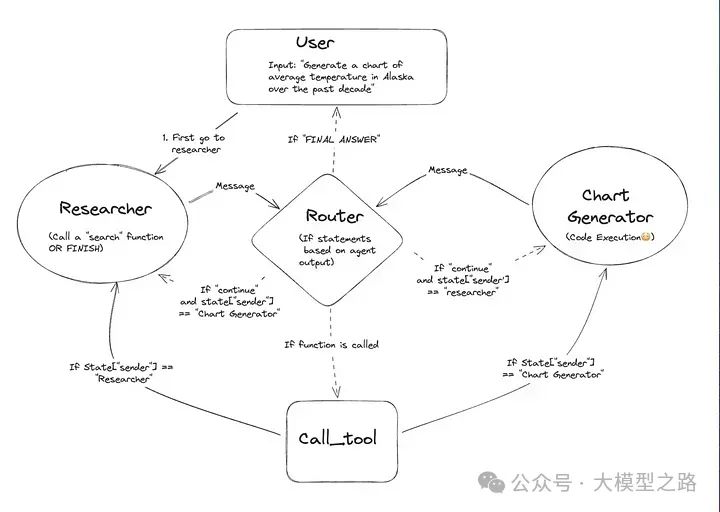
我们选择LangChain框架来构建此系统,因为它提供了丰富的工具集和灵活的架构支持。同时,我们采用ChatOpenAI的GPT-4o-mini模型作为底层语言模型,以支持各智能体的自然语言理解和生成能力。
 ### 多智能体工作流程
1. 初始请求处理
用户通过系统接口提交一个请求,例如"获取印度过去五年的GDP数据,并生成可视化图表"。
2. 数据采集阶段
数据采集智能体接收请求后,开始搜集相关数据。它可能通过调用搜索引擎API(如Tavily工具),检索到印度过去五年每年的GDP数据。收集到的数据以特定格式(如JSON)返回,并添加到全局状态中。
3. 任务路由决策
任务路由智能体根据当前状态(即全局状态中的消息列表)和最新消息内容,决定下一步行动。如果数据采集智能体已收集到足够数据,且不具备直接生成图表的能力,路由智能体会将任务传递给可视化生成智能体。
4. 图表生成阶段
可视化生成智能体接收到任务后,开始将收集到的数据转换为可视化图表。它首先选择合适的图表类型(如折线图、柱状图等),然后使用Python的matplotlib库等工具生成图表。生成的图表以图片形式保存,并添加到全局状态中。
5. 工具调用与执行
在图表生成过程中,可视化生成智能体可能需要调用外部工具(如Python脚本执行器)来辅助生成图表。执行工具智能体负责执行这些外部工具,并将执行结果返回给可视化生成智能体。
6. 结果整合与呈现
当图表生成完成后,可视化生成智能体将图表和相关GDP数据整合为最终答案,通过系统接口呈现给用户。最终答案可能包含图表图片、GDP数据表格、数据来源等详细信息。
多智能体系统实现
1. 环境准备
pip install -U langchain langchain_openai langsmith pandas langchain_experimental matplotlib langgraph langchain_core
2. 智能体创建函数
from langchain_core.messages import (
    BaseMessage,
    HumanMessage,
    ToolMessage,
)
from langchain_core.prompts import ChatPromptTemplate, MessagesPlaceholder

from langgraph.graph import END, StateGraph, START


def build_intelligent_agent(llm, tools, system_message: str):
    """创建一个智能体"""
    prompt = ChatPromptTemplate.from_messages(
        [
            (
                "system",
                "你是一个有用的AI助手,与其他助手协作完成用户任务。"
                "使用提供的工具推进问题解决过程。"
                "如果你无法完全回答,没关系,其他拥有不同工具的助手会接替你的工作继续完成。"
                "执行你能做的任务来取得进展。"
                "如果你或任何其他助手有了最终答案或交付成果,"
                "请在回复前加上FINAL ANSWER,以便团队知道停止工作。"
                "你可以使用以下工具:{tool_names}。\n{system_message}",
            ),
            MessagesPlaceholder(variable_name="messages"),
        ]
    )
    prompt = prompt.partial(system_message=system_message)
    prompt = prompt.partial(tool_names=", ".join([tool.name for tool in tools]))
    return prompt | llm.bind_tools(tools)
这是创建LLM智能体的通用函数,通过给定一组工具和对应智能体的描述来创建相应的智能体。
3. 工具定义
from typing import Annotated

from langchain_community.tools.tavily_search import TavilySearchResults
from langchain_core.tools import tool
from langchain_experimental.utilities import PythonREPL

search_tool = TavilySearchResults(max_results=5)

# 注意:此代码在本地执行,未在沙箱环境中运行时可能存在安全风险

code_executor = PythonREPL()


@tool
def python_code_executor(
    code: Annotated[str, "要执行以生成图表的Python代码。"],
):
    """使用此函数执行Python代码。如果你想查看某个值的输出,应该使用print(...)打印出来,这对用户是可见的。"""
    try:
        result = code_executor.run(code)
    except BaseException as e:
        return f"执行失败。错误:{repr(e)}"
    result_str = f"成功执行:\n```python\n{code}\n```\n输出: {result}"
    return (
        result_str + "\n\n如果你已完成所有任务,请回复FINAL ANSWER。")
这里提供了两个工具:一个是用于搜索的工具,另一个是用于执行Python代码的工具。
4. 智能体状态设置
我们这里提到的智能体都是有状态的智能体,有状态LLM智能体会保留和更新交互中的上下文信息,从而动态调整其决策过程。这种架构有助于进行复杂推理,支持顺序任务中的长期依赖关系。
import operator
from typing import Annotated, Sequence, TypedDict

from langchain_openai import ChatOpenAI


# 定义在图中各节点之间传递的对象
# 我们将为每个智能体和工具创建不同的节点
class IntelligentAgentState(TypedDict):
    messages: Annotated[Sequence[BaseMessage], operator.add]
    sender: str
5. 智能体定义
import functools

from langchain_core.messages import AIMessage


# 为特定智能体创建节点的辅助函数
def process_agent_node(state, agent, agent_name):
    result = agent.invoke(state)
    # 将智能体输出转换为适合追加到全局状态的格式
    if isinstance(result, ToolMessage):
        pass
    else:
        result = AIMessage(**result.dict(exclude={"type", "name"}), name=agent_name)
    return {
        "messages": [result],
        # 由于我们有严格的工作流程,我们可以
        # 跟踪发送者,以便知道下一步传递给谁
        "sender": agent_name,
    }


language_model = ChatOpenAI(model="gpt-4o-mini")

# 数据采集智能体和节点
data_collector_agent = build_intelligent_agent(
    language_model,
    [search_tool],
    system_message="你应该为可视化生成器提供准确的数据。",
)
data_collector_node = functools.partial(process_agent_node, agent=data_collector_agent, name="DataCollector")

# 可视化生成智能体
visualization_agent = build_intelligent_agent(
    language_model,
    [python_code_executor],
    system_message="你显示的任何图表对用户都是可见的。",
)
visualization_node = functools.partial(process_agent_node, agent=visualization_agent, name="Visualizer")


from langgraph.prebuilt import ToolNode

available_tools = [search_tool, python_code_executor]
tool_execution_node = ToolNode(available_tools)
6. 智能体循环执行逻辑
这里用来判断当前是结束调用还是继续智能体循环调用工具。
# 任一智能体都可以决定结束
from typing import Literal


def determine_next_action(state) -> Literal["execute_tool", "__end__", "continue"]:
    # 这是路由函数
    messages = state["messages"]
    last_message = messages[-1]
    if last_message.tool_calls:
        # 前一个智能体正在调用工具
        return "execute_tool"
    if "FINAL ANSWER" in last_message.content:
        # 任一智能体决定工作已完成
        return "__end__"
    return "continue"
7. 完整工作流定义
collaboration_workflow = StateGraph(IntelligentAgentState)

collaboration_workflow.add_node("DataCollector", data_collector_node)
collaboration_workflow.add_node("Visualizer", visualization_node)
collaboration_workflow.add_node("execute_tool", tool_execution_node)

collaboration_workflow.add_conditional_edges(
    "DataCollector",
    determine_next_action,
    {"continue": "Visualizer", "execute_tool": "execute_tool", "__end__": END},
)
collaboration_workflow.add_conditional_edges(
    "Visualizer",
    determine_next_action,
    {"continue": "DataCollector", "execute_tool": "execute_tool", "__end__": END},
)

collaboration_workflow.add_conditional_edges(
    "execute_tool",
    # 每个智能体节点更新"sender"字段
    # 工具调用节点不更新,这意味着
    # 此边将路由回调用原始工具的智能体
    lambda x: x["sender"],
    {
        "DataCollector": "DataCollector",
        "Visualizer": "Visualizer",
    },
)
collaboration_workflow.add_edge(START, "DataCollector")
processing_graph = collaboration_workflow.compile()
8. 系统执行
collaboration_workflow.add_edge(START, "DataCollector")
processing_graph = collaboration_workflow.compile()

processing_events = processing_graph.stream(
    {
        "messages": [
            HumanMessage(
                content="获取印度过去五年的GDP数据并绘制图表"
            )
        ],
    },
    # 图中最大执行步数
    {"recursion_limit": 150},
)
for event in processing_events:
    print(event)
    print("----")
通过构建多智能体系统,我们可以有效地将复杂任务分解为多个子任务,并由不同的LLM智能体协作完成。这不仅提高了系统的灵活性和可扩展性,还使每个智能体能专注于其擅长的领域,从而提升整体性能和效率。这种架构在处理复杂数据处理和可视化任务时尤为有用,为AI在实际应用中的落地提供了可行方案。
