Spring Boot 集成 Swagger 实现 API 文档自动化
1. 引入 Maven 依赖
在 Spring Boot 项目中使用 Swagger 生成接口文档,首先需要添加对应的依赖包。通过引入 springfox 框架,可以实现 API 的自动扫描与可视化展示。
<dependency>
    <groupId>io.springfox</groupId>
    <artifactId>springfox-swagger2</artifactId>
    <version>2.9.2</version>
</dependency>
<dependency>
    <groupId>io.springfox</groupId>
    <artifactId>springfox-swagger-ui</artifactId>
    <version>2.9.2</version>
</dependency>
2. 配置 Swagger 配置类
创建一个配置类启用 Swagger 功能,并定义文档的元信息及扫描范围。该类需标注 @Configuration 和 @EnableSwagger2 注解。
@Configuration
@EnableSwagger2
public class ApiDocumentationConfig {

    @Bean
    public Docket buildDocket() {
        return new Docket(DocumentationType.SWAGGER_2)
                .apiInfo(generateApiInfo())
                .select()
                .apis(RequestHandlerSelectors.basePackage("com.example.controller"))
                .paths(PathSelectors.any())
                .build();
    }

    private ApiInfo generateApiInfo() {
        return new ApiInfoBuilder()
                .title("用户服务 API 文档")
                .description("基于 Spring Boot 与 Swagger 构建的后端接口说明")
                .version("1.0.0")
                .build();
    }
}
3. 在控制器中使用注解描述接口
通过在 Controller 类和方法上添加 Swagger 注解,可清晰地描述每个接口的功能和参数。
@RestController
@RequestMapping("/api/users")
@Api(tags = "用户操作接口")
public class UserManagementController {

    @PostMapping
    @ApiOperation("创建新用户")
    @ApiImplicitParams({
        @ApiImplicitParam(name = "username", value = "用户名", example = "张三"),
        @ApiImplicitParam(name = "address", value = "居住地址", example = "北京", required = true)
    })
    public ResponseEntity<UserDto> createUser(String username, @RequestParam String address) {
        UserDto user = new UserDto();
        user.setUsername(username);
        user.setAddress(address);
        return ResponseEntity.ok(user);
    }

    @GetMapping("/{id}")
    @ApiOperation("根据ID获取用户详情")
    @ApiImplicitParam(name = "id", value = "用户编号", required = true, dataType = "Integer", paramType = "path")
    public ResponseEntity<UserDto> fetchUser(@PathVariable Integer id) {
        UserDto user = new UserDto();
        user.setId(id);
        user.setUsername("测试用户");
        return ResponseEntity.ok(user);
    }

    @PutMapping("/{id}")
    @ApiOperation("更新用户信息")
    public ResponseEntity<UserDto> updateUser(@PathVariable Integer id, @RequestBody UserDto user) {
        user.setId(id);
        return ResponseEntity.ok(user);
    }
}
4. 常用注解说明
- @Api:用于类级别,标记该控制器提供的一组相关接口。
- @ApiOperation:描述某个具体接口的作用。
- @ApiImplicitParam:描述单个请求参数,支持设置示例值、是否必填等属性。
- @ApiImplicitParams:包含多个
@ApiImplicitParam的容器注解。 - 注意:
required = true在@ApiImplicitParam中仅影响 UI 展示,实际参数校验仍需配合@RequestParam(required = true)使用。
5. 实体类字段说明
当接口接收对象类型参数时,可在实体类字段上使用 @ApiModelProperty 注解进行详细说明。
@ApiModel(description = "用户数据传输对象")
public class UserDto {
    @ApiModelProperty(value = "唯一标识符", example = "1001")
    private Integer id;

    @ApiModelProperty(value = "登录名称", example = "王五")
    private String username;

    @ApiModelProperty(value = "所在城市", example = "上海")
    private String address;

    // getter 和 setter 方法
    public Integer getId() { return id; }
    public void setId(Integer id) { this.id = id; }

    public String getUsername() { return username; }
    public void setUsername(String username) { this.username = username; }

    public String getAddress() { return address; }
    public void setAddress(String address) { this.address = address; }
}
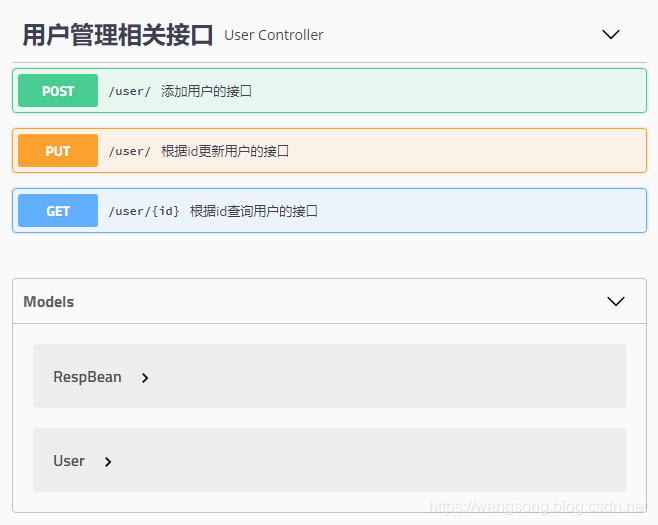
6. 查看文档界面
启动项目后访问 http://localhost:8080/swagger-ui.html 即可查看自动生成的交互式 API 文档页面,支持在线调试接口。
7. 与 Spring Security 共存配置
若项目中集成了 Spring Security,需放行 Swagger 相关资源路径,避免被安全拦截。
@Override
public void configure(WebSecurity web) throws Exception {
    web.ignoring()
        .antMatchers("/swagger-ui.html")
        .antMatchers("/webjars/**")
        .antMatchers("/v2/api-docs")
        .antMatchers("/swagger-resources/**");
}
