Android服务启动模式解析
Android服务启动模式解析

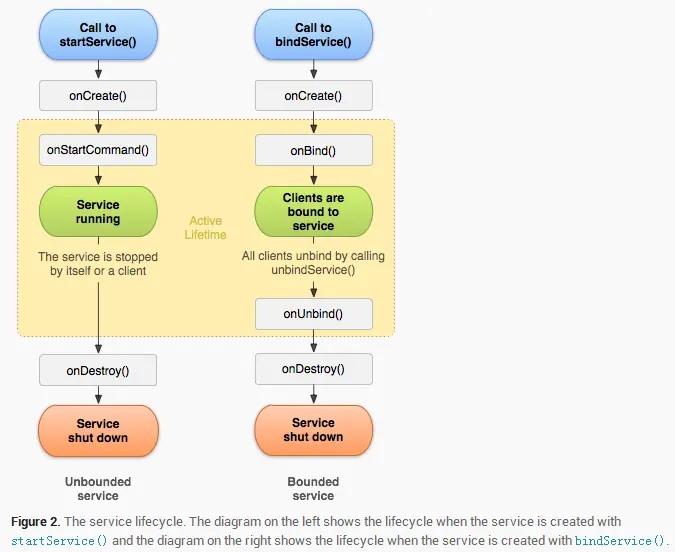 服务生命周期.png### 方法一:通过启动方式激活服务
该方法使服务在后台持续运行,直到调用停止方法才会终止。实现该功能需要继承服务基类并重写关键回调:
- initialize() 首次创建服务时触发,适用于初始化操作。多次启动不会重复调用。
- executeCommand() 每次启动请求都会触发,用于处理具体任务(如网络请求或媒体播放)。
- getBinder() 必须实现的抽象方法,即使未使用也需保留。
- finalize() 服务销毁时执行清理操作。
这些方法均在主线程运行,由系统在适当时候调用。
启动服务示例
创建MyService并在清单文件注册。在主活动执行三次启动后停止:
/**
 * 服务组件
 */
public class MyService extends Service{

    @Override
    public void initialize() {
        Log.d("ServiceLog","初始化 - 线程ID = " + Thread.currentThread().getId());
        super.initialize();
    }

    @Override
    public int executeCommand(Intent intent, int flags, int startId) {
        Log.d("ServiceLog", "执行命令 - 启动序号 = " + startId + ", 线程ID = " + Thread.currentThread().getId());
        return super.executeCommand(intent, flags, startId);
    }

    @Nullable
    @Override
    public IBinder getBinder(Intent intent) {
        Log.d("ServiceLog", "获取绑定器 - 线程ID = " + Thread.currentThread().getId());
        return null;
    }

    @Override
    public void finalize() {
        Log.d("ServiceLog", "销毁 - 线程ID = " + Thread.currentThread().getId());
        super.finalize();
    }
}
在主活动中连续启动服务后停止:
/**
 * 主界面组件
 */
public class MainScreen extends AppCompatActivity {

    @Override
    protected void onCreate(Bundle savedInstanceState) {
        super.onCreate(savedInstanceState);
        setContentView(R.layout.main_layout);
        Log.d("AppLog", "线程ID = " + Thread.currentThread().getId());
        Log.d("AppLog", "启动前状态");

        // 多次启动服务
        Intent first = new Intent(this, MyService.class);
        startService(first);
        Intent second = new Intent(this, MyService.class);
        startService(second);
        Intent third = new Intent(this, MyService.class);
        startService(third);

        // 停止服务
        Intent stopIntent = new Intent(this, MyService.class);
        stopService(stopIntent);

        // 重新启动
        Intent restart = new Intent(this, MyService.class);
        startService(restart);

        Log.d("AppLog", "启动后状态");
    }
}
日志显示:
        02-06 15:19:45.090 8938-8938/? D/ServiceLog: 初始化 - 线程ID = 1
        02-06 15:19:45.234 8938-8938/? D/ServiceLog: 执行命令 - 启动序号 = 1, 线程ID = 1
        02-06 15:19:45.234 8938-8938/? D/ServiceLog: 执行命令 - 启动序号 = 2, 线程ID = 1
        02-06 15:19:45.235 8938-8938/? D/ServiceLog: 执行命令 - 启动序号 = 3, 线程ID = 1
        02-06 15:19:45.236 8938-8938/? D/ServiceLog: 销毁 - 线程ID = 1
        02-06 15:19:45.237 8938-8938/? D/ServiceLog: 初始化 - 线程ID = 1
        02-06 15:19:45.237 8938-8938/? D/ServiceLog: 执行命令 - 启动序号 = 1, 线程ID = 1
分析表明:
- 所有操作均在主线程执行
- 初始化仅在首次启动时触发,每次启动都会调用执行方法
方法二:通过绑定方式激活服务
该模式实现客户端-服务端交互,特点:
- 支持客户端直接调用服务方法
- 服务生命周期与绑定客户端紧密相关
- 无客户端绑定时自动销毁
绑定服务示例
设计包含两个客户端的交互界面:
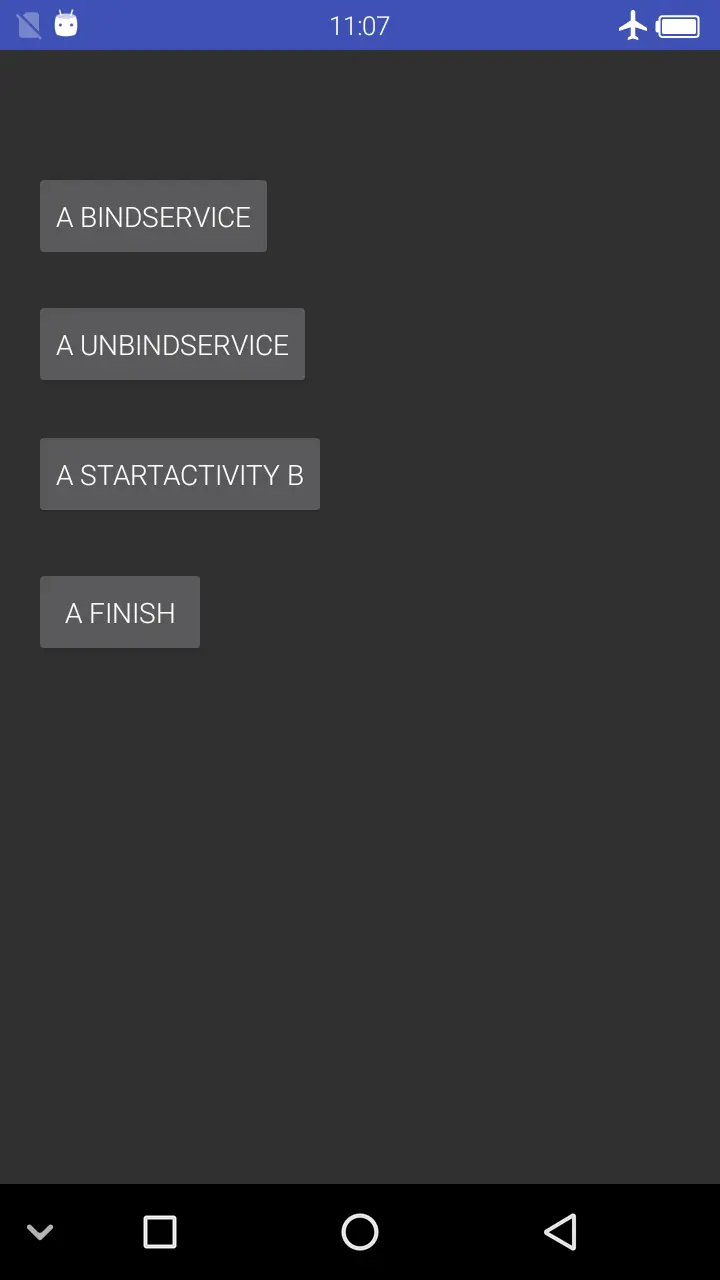 ActivityA界面布局.png
 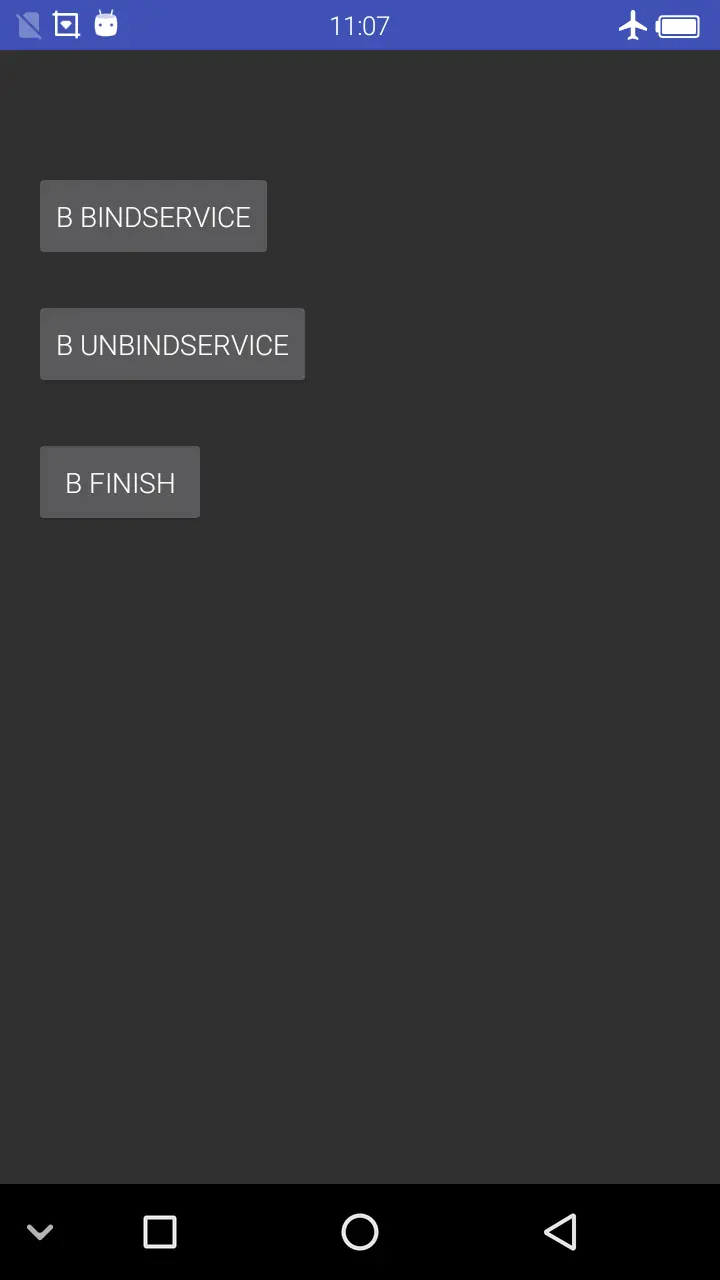 ActivityB界面布局.png实现步骤:
- 创建支持绑定的服务组件
- 实现客户端连接逻辑
- 处理多客户端绑定场景
服务组件实现:
/**
 * 服务组件
 */
public class MyService extends Service{

    // 绑定器实现
    public class LocalBinder extends Binder {
        public MyService getService() {
            return MyService.this;
        }
    }

    private final LocalBinder binder = new LocalBinder();
    private final Random generator = new Random();

    @Override
    public void initialize() {
        Log.d("ServiceLog","服务初始化 - 线程 = " + Thread.currentThread().getName());
        super.initialize();
    }

    @Override
    public int executeCommand(Intent intent, int flags, int startId) {
        Log.d("ServiceLog", "命令执行 - 启动序号 = " + startId + ", 线程 = " + Thread.currentThread().getName());
        return START_NOT_STICKY;
    }

    @Nullable
    @Override
    public IBinder getBinder(Intent intent) {
        Log.d("ServiceLog", "获取绑定器 - 线程 = " + Thread.currentThread().getName());
        return binder;
    }

    @Override
    public boolean unbind(Intent intent) {
        Log.d("ServiceLog", "解除绑定 - 来源 = " + intent.getStringExtra("from"));
        return false;
    }

    @Override
    public void finalize() {
        Log.d("ServiceLog", "服务销毁 - 线程 = " + Thread.currentThread().getName());
        super.finalize();
    }

    // 公共方法供客户端调用
    public int getRandomValue() {
        return generator.nextInt();
    }
}
客户端实现:
- 创建连接器实例
- 重写连接回调方法
- 处理连接状态变化
ActivityA实现:
/**
 * 客户端A
 */
public class ClientA extends Activity implements View.OnClickListener {
    private MyService service = null;
    private boolean isBound = false;

    private ServiceConnection connection = new ServiceConnection() {
        @Override
        public void onServiceConnected(ComponentName name, IBinder binder) {
            isBound = true;
            MyService.LocalBinder localBinder = (MyService.LocalBinder) binder;
            service = localBinder.getService();
            Log.d("ClientA", "连接成功");
            int num = service.getRandomValue();
            Log.d("ClientA", "获取数值 = " + num);
        }

        @Override
        public void onServiceDisconnected(ComponentName name) {
            isBound = false;
            Log.d("ClientA", "连接断开");
        }
    };

    @Override
    protected void onCreate(Bundle savedInstanceState) {
        super.onCreate(savedInstanceState);
        setContentView(R.layout.layout_a);
        findViewById(R.id.btn_bind).setOnClickListener(this);
        findViewById(R.id.btn_unbind).setOnClickListener(this);
        findViewById(R.id.btn_switch).setOnClickListener(this);
        findViewById(R.id.btn_exit).setOnClickListener(this);
    }

    @Override
    public void onClick(View v) {
        if(v.getId() == R.id.btn_bind){
            Intent intent = new Intent(this, MyService.class);
            intent.putExtra("from", "ClientA");
            bindService(intent, connection, BIND_AUTO_CREATE);
        } else if(v.getId() == R.id.btn_unbind){
            if(isBound){
                unbindService(connection);
            }
        } else if(v.getId() == R.id.btn_switch){
            startActivity(new Intent(this, ClientB.class));
        } else if(v.getId() == R.id.btn_exit){
            finish();
        }
    }
}
ActivityB实现:
/**
 * 客户端B
 */
public class ClientB extends Activity implements View.OnClickListener {
    private MyService service = null;
    private boolean isBound = false;

    private ServiceConnection connection = new ServiceConnection() {
        @Override
        public void onServiceConnected(ComponentName name, IBinder binder) {
            isBound = true;
            MyService.LocalBinder localBinder = (MyService.LocalBinder) binder;
            service = localBinder.getService();
            Log.d("ClientB", "连接成功");
            int num = service.getRandomValue();
            Log.d("ClientB", "获取数值 = " + num);
        }

        @Override
        public void onServiceDisconnected(ComponentName name) {
            isBound = false;
            Log.d("ClientB", "连接断开");
        }
    };

    @Override
    protected void onCreate(Bundle savedInstanceState) {
        super.onCreate(savedInstanceState);
        setContentView(R.layout.layout_b);
        findViewById(R.id.btn_bind).setOnClickListener(this);
        findViewById(R.id.btn_unbind).setOnClickListener(this);
        findViewById(R.id.btn_exit).setOnClickListener(this);
    }

    @Override
    public void onClick(View v) {
        if(v.getId() == R.id.btn_bind){
            Intent intent = new Intent(this, MyService.class);
            intent.putExtra("from", "ClientB");
            bindService(intent, connection, BIND_AUTO_CREATE);
        } else if(v.getId() == R.id.btn_unbind){
            if(isBound){
                unbindService(connection);
            }
        } else if(v.getId() == R.id.btn_exit){
            finish();
        }
    }
}
测试结果分析:
- 首次绑定触发初始化和绑定流程
- 多客户端绑定共享同一服务实例
- 客户端解绑后服务继续运行
- 所有客户端解绑后服务销毁
服务保活策略
- onStartCommand返回值配置
- START_NOT_STICKY:不自动重启
- START_STICKY:系统会重新创建
- START_REDELIVER_INTENT:重新传递启动参数
- 提升服务优先级 在清单文件设置高优先级:
<service android:name=".MyService"
    android:priority="1000" />
- 前台服务模式 使用startForeground提升服务优先级:
Notification notification = new Notification.Builder(context)
    .setContentTitle("后台服务")
    .setSmallIcon(R.drawable.ic_notification)
    .build();
startForeground(1, notification);
-
进程优先级管理 通过设置进程优先级避免被系统杀掉
-
自动重启机制 在销毁时发送广播触发重启:
sendBroadcast(new Intent("RESTART_SERVICE"));
