Ubuntu平台部署Blazor Server应用实战指南
第一部分:配置.NET Core运行环境
1.1 在Ubuntu 24.04 x64上安装ASP.NET Core运行时
| 步骤 | 命令 | 说明 |
|---|---|---|
| 安装必要组件 | sudo apt install -y software-properties-common |
获取add-apt-repository指令以管理软件源 |
| 添加Backports仓库 | sudo add-apt-repository ppa:dotnet/backports |
引入.NET 9官方后移植软件源 |
| 刷新包索引 | sudo apt update |
同步新源中的包信息 |
| 部署运行时 | sudo apt install -y aspnetcore-runtime-9.0 |
安装ASP.NET Core运行时(建议),若需开发环境可执行sudo apt install -y dotnet-sdk-9.0 |
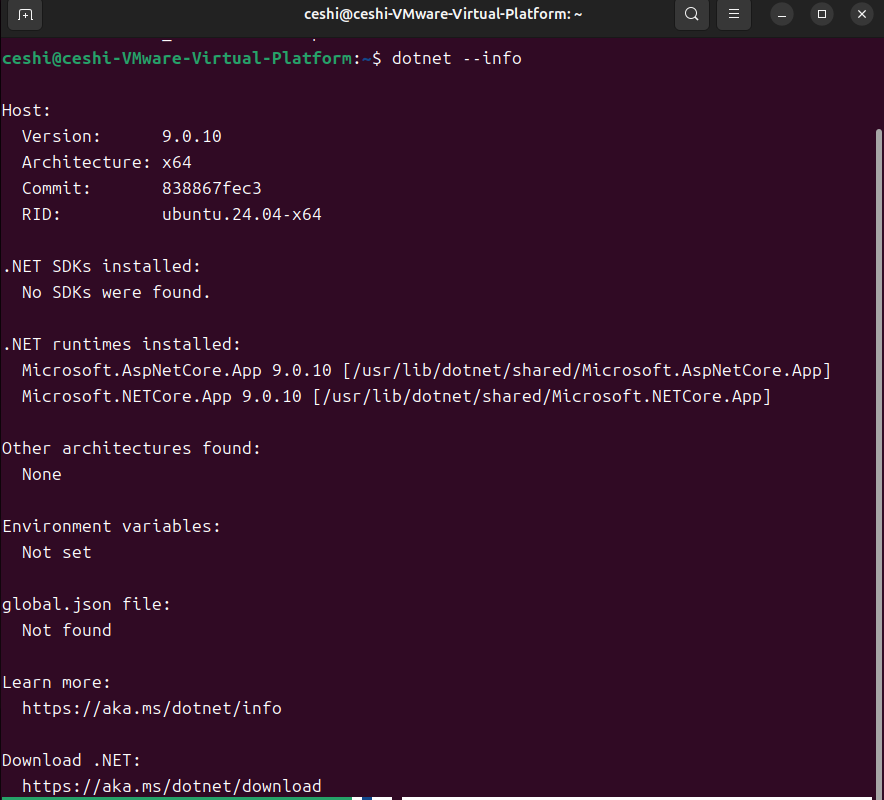
验证部署成果:
dotnet --info成功时界面类似下图:
1.2 发布与传输Blazor Server应用
将Blazor Server项目发布为Linux-64目标,利用WinSCP上传至Ubuntu目录,并调整权限:
sudo chmod 777 /path/to/your/target_directory传输完成后,将目录权限收紧为755:
1.3 本地启动应用
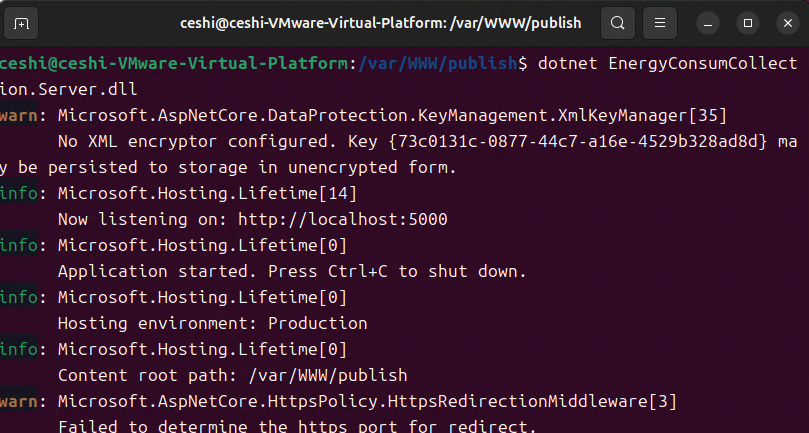
进入应用目录执行:
dotnet EnergyConsumCollection.Server.dll此时可在本地访问,效果如下:
第二部分:配置Nginx反向代理
2.1 安装Nginx
sudo apt install -y nginx
sudo systemctl start nginx
sudo systemctl enable nginx
sudo systemctl status nginx
2.2 基础防火墙设置
sudo ufw enable
sudo ufw allow 'Nginx Full'
sudo ufw allow ssh
sudo ufw status
2.3 配置反向代理
创建站点配置:
sudo nano /etc/nginx/sites-available/blazor-app写入以下内容:
server {
    listen 80;
    server_name your-domain.com;  # 替换为您的域名或IP
    client_max_body_size 100M;

    # 静态资源缓存优化
    location ~* \.(css|js|png|jpg|jpeg|gif|ico|svg|woff|woff2|ttf|eot)$ {
        expires 1y;
        add_header Cache-Control "public, immutable";
        proxy_pass http://localhost:5000;
        proxy_http_version 1.1;
        proxy_set_header Upgrade $http_upgrade;
        proxy_set_header Connection keep-alive;
        proxy_set_header Host $host;
        proxy_cache_bypass $http_upgrade;
        proxy_set_header X-Forwarded-For $proxy_add_x_forwarded_for;
        proxy_set_header X-Forwarded-Proto $scheme;
    }

    # Blazor应用主代理
    location / {
        proxy_pass http://localhost:5000;
        proxy_http_version 1.1;
        proxy_set_header Upgrade $http_upgrade;
        proxy_set_header Connection "upgrade";
        proxy_set_header Host $host;
        proxy_set_header X-Real-IP $remote_addr;
        proxy_set_header X-Forwarded-For $proxy_add_x_forwarded_for;
        proxy_set_header X-Forwarded-Proto $scheme;
        proxy_cache_bypass $http_upgrade;

        # 长连接超时设置
        proxy_connect_timeout 60s;
        proxy_send_timeout 60s;
        proxy_read_timeout 60s;

        # 禁用缓冲
        proxy_buffering off;
        proxy_request_buffering off;
    }

    # 健康检查端点
    location /health {
        proxy_pass http://localhost:5000/health;
        access_log off;
    }
}
2.4 启用站点
sudo ln -s /etc/nginx/sites-available/blazor-app /etc/nginx/sites-enabled/
sudo nginx -t
sudo systemctl reload nginx
2.5 创建systemd服务
编写服务文件:
sudo nano /etc/systemd/system/blazor-app.service配置如下:
[Unit]
Description=Blazor Server Application
After=network.target

[Service]
Type=exec
WorkingDirectory=/var/www/blazor-app
ExecStart=/usr/bin/dotnet /var/www/blazor-app/EnergyConsumCollection.Server.dll
Restart=always
RestartSec=10
KillSignal=SIGINT
TimeoutStopSec=90
SyslogIdentifier=blazor-app
User=www-data
Group=www-data
Environment=ASPNETCORE_ENVIRONMENT=Production
Environment=DOTNET_PRINT_TELEMETRY_MESSAGE=false
Environment=ASPNETCORE_URLS=http://localhost:5000
NoNewPrivileges=true
PrivateTmp=true
ProtectSystem=strict
ProtectHome=true
ReadWritePaths=/var/www/blazor-app

[Install]
WantedBy=multi-user.target
2.6 启动服务
sudo systemctl daemon-reload
sudo systemctl start blazor-app.service
sudo systemctl enable blazor-app.service
sudo systemctl status blazor-app.service
sudo journalctl -u blazor-app.service -f
第三部分:常见问题处理
3.1 显示"Nginx欢迎页"而非应用
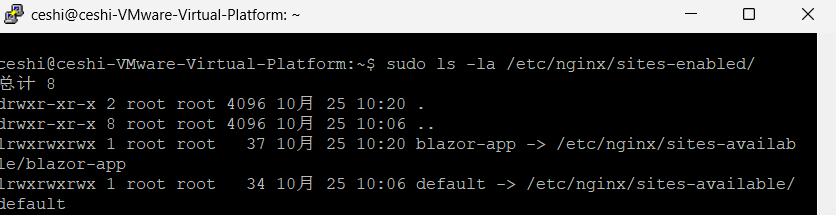
检查启用的站点配置:
sudo ls -la /etc/nginx/sites-enabled/
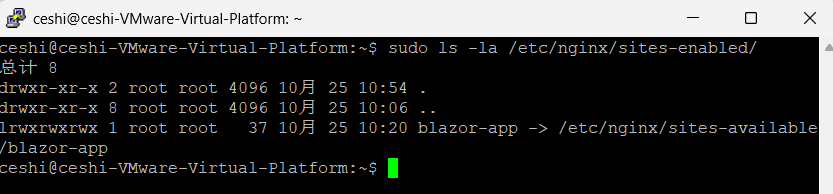
sudo ls -la /etc/nginx/sites-enabled/default若存在默认站点(如下图),需禁用:
sudo rm -f /etc/nginx/sites-enabled/default或重命名:
sudo mv /etc/nginx/sites-enabled/default /etc/nginx/sites-enabled/default.disabled最终仅保留自定义配置,即可正常远程访问:
3.2 Blazor新版本部署后局域网访问异常
错误提示:连接中断、重连失败或服务器拒绝连接。
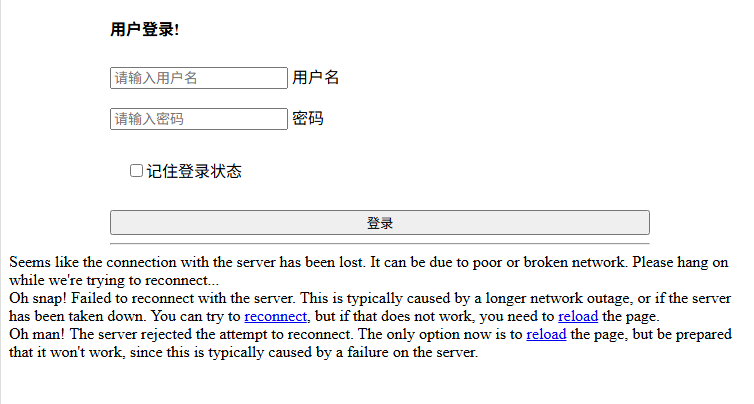
解决方案:清除浏览器缓存与Cookies后即可正常访问。
第四部分:Linux环境下的应用升级
4.1 停止服务并备份
sudo systemctl stop blazor-app
sudo mv '/var/www/blazor-app' /var/www/blazor-app_backup_$(date +%Y%m%d)
sudo cp /etc/systemd/system/blazor-app.service /etc/systemd/system/blazor-app_backup_$(date +%Y%m%d).service
4.2 上传新版本并设置权限
使用WinSCP将发布后的程序传输至Ubuntu,调整目录权限:
sudo chmod 755 /var/www/blazor-app4.3 重启服务
参照2.6节操作,重新加载配置并启动服务。
