二叉树结构与遍历算法实现
二叉树基本概念
二叉树是每个节点最多包含两个子节点的树形结构,具有递归定义特性:可为空树,或由根节点及其左右子树构成。
- 满二叉树:除叶子节点外所有节点都有两个子节点
- 完全二叉树:节点按层级顺序排列,最后一层节点左对齐
- 二叉搜索树:左子节点值小于根节点,右子节点值大于根节点
- 平衡二叉树:任意节点左右子树高度差不超过1
二叉树构建方法
#include <iostream>
#include <vector>
#include <queue>

struct BinaryNode {
    std::string element;
    BinaryNode* lchild;
    BinaryNode* rchild;
    BinaryNode() : element(""), lchild(nullptr), rchild(nullptr) {}
    BinaryNode(std::string elem) : element(elem), lchild(nullptr), rchild(nullptr) {}
};

BinaryNode* constructTree(const std::vector<std::string>& elements) {
    if(elements.empty()) return nullptr;

    BinaryNode* root = new BinaryNode(elements[0]);
    std::queue<BinaryNode*> nodeQueue;
    nodeQueue.push(root);
    int pos = 1, total = elements.size();

    while(pos < total) {
        BinaryNode* curr = nodeQueue.front();
        nodeQueue.pop();

        if(pos < total) {
            curr->lchild = new BinaryNode(elements[pos]);
            nodeQueue.push(curr->lchild);
            pos++;
        }
        if(pos < total) {
            curr->rchild = new BinaryNode(elements[pos]);
            nodeQueue.push(curr->rchild);
            pos++;
        }
    }
    return root;
}
前序遍历
访问顺序:根节点 → 左子树 → 右子树
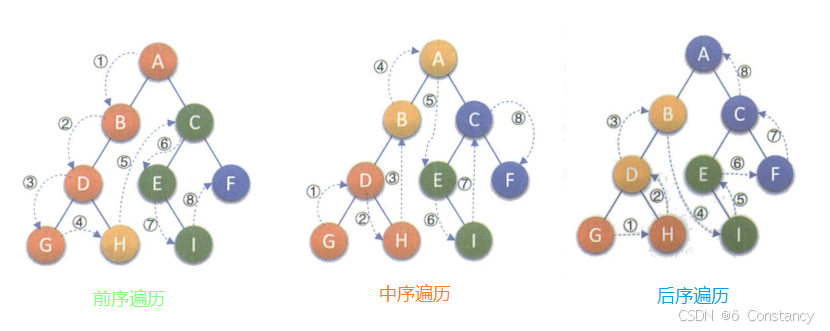
遍历结果:ABDGHCEIF
递归实现
void preOrderVisit(BinaryNode* node, std::vector<std::string>& output) {
    if(!node) return;
    output.push_back(node->element);
    preOrderVisit(node->lchild, output);
    preOrderVisit(node->rchild, output);
}
迭代实现
void iterativePreOrder(BinaryNode* root, std::vector<std::string>& output) {
    if(!root) return;

    std::stack<BinaryNode*> nodeStack;
    nodeStack.push(root);

    while(!nodeStack.empty()) {
        BinaryNode* curr = nodeStack.top();
        nodeStack.pop();
        output.push_back(curr->element);

        if(curr->rchild) nodeStack.push(curr->rchild);
        if(curr->lchild) nodeStack.push(curr->lchild);
    }
}
中序遍历
访问顺序:左子树 → 根节点 → 右子树
遍历结果:GDHBAEICF
递归实现
void inOrderVisit(BinaryNode* node, std::vector<std::string>& output) {
    if(!node) return;
    inOrderVisit(node->lchild, output);
    output.push_back(node->element);
    inOrderVisit(node->rchild, output);
}
迭代实现
void iterativeInOrder(BinaryNode* root, std::vector<std::string>& output) {
    std::stack<BinaryNode*> nodeStack;
    BinaryNode* curr = root;

    while(curr || !nodeStack.empty()) {
        while(curr) {
            nodeStack.push(curr);
            curr = curr->lchild;
        }
        curr = nodeStack.top();
        nodeStack.pop();
        output.push_back(curr->element);
        curr = curr->rchild;
    }
}
后序遍历
访问顺序:左子树 → 右子树 → 根节点
遍历结果:GHDBIEFCA
递归实现
void postOrderVisit(BinaryNode* node, std::vector<std::string>& output) {
    if(!node) return;
    postOrderVisit(node->lchild, output);
    postOrderVisit(node->rchild, output);
    output.push_back(node->element);
}
迭代实现
void iterativePostOrder(BinaryNode* root, std::vector<std::string>& output) {
    if(!root) return;

    std::stack<BinaryNode*> nodeStack;
    nodeStack.push(root);

    while(!nodeStack.empty()) {
        BinaryNode* curr = nodeStack.top();
        nodeStack.pop();
        output.push_back(curr->element);

        if(curr->lchild) nodeStack.push(curr->lchild);
        if(curr->rchild) nodeStack.push(curr->rchild);
    }
    std::reverse(output.begin(), output.end());
}
层序遍历
按层级从上到下访问节点
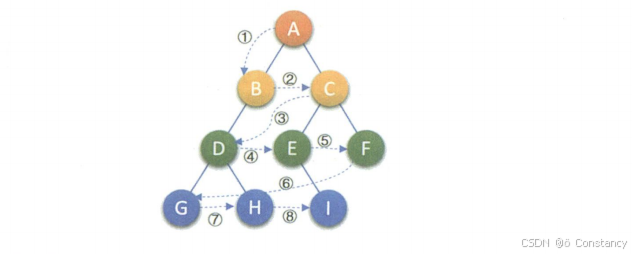
遍历结果:ABCDEFGHI
std::vector<std::vector<std::string>> levelOrderVisit(BinaryNode* root) {
    std::queue<BinaryNode*> nodeQueue;
    std::vector<std::vector<std::string>> result;

    if(root) nodeQueue.push(root);

    while(!nodeQueue.empty()) {
        int levelSize = nodeQueue.size();
        std::vector<std::string> currentLevel;

        for(int i = 0; i < levelSize; ++i) {
            BinaryNode* curr = nodeQueue.front();
            nodeQueue.pop();
            currentLevel.push_back(curr->element);

            if(curr->lchild) nodeQueue.push(curr->lchild);
            if(curr->rchild) nodeQueue.push(curr->rchild);
        }
        result.push_back(currentLevel);
    }
    return result;
}
完整示例
int main() {
    std::vector<std::string> nodeData{"A","B","C","D","E","F","G","H","I"};
    BinaryNode* treeRoot = constructTree(nodeData);

    std::vector<std::string> preResult;
    preOrderVisit(treeRoot, preResult);

    std::vector<std::string> inResult;
    inOrderVisit(treeRoot, inResult);

    std::vector<std::string> postResult;
    postOrderVisit(treeRoot, postResult);

    auto levelResult = levelOrderVisit(treeRoot);
    return 0;
}