CentOS 7 系统下构建 ElasticSearch 7.14.0 及其可视化套件环境
在 CentOS 7.9 环境中部署全文检索套件,通常需要整合 ElasticSearch 服务、可视化管理工具 Head 插件、数据分析平台 Kibana 以及必需的运行时环境(JDK 与 Node.js)。
一、 环境基础:安装 JDK 11
ElasticSearch 7.14.0 依赖 Java 环境,建议使用 JDK 11。
# 创建安装目录并解压
mkdir -p /opt/java
tar -xzvf jdk-11_linux-x64_bin.tar.gz -C /opt/java

# 维护全局环境变量
cat >> /etc/profile <<EOF
export JAVA_HOME=/opt/java/jdk-11
export ES_JAVA_HOME=\$JAVA_HOME
export PATH=\$JAVA_HOME/bin:\$PATH
EOF

# 加载配置并验证
source /etc/profile
java -version
二、 核心引擎:安装 ElasticSearch 7.14.0
由于安全策略,ElasticSearch 不允许使用 root 用户直接启动,需创建专用用户并调整系统句柄数限制。
1. 用户与权限准备
# 创建名为 es_runtime 的管理用户
useradd es_runtime
echo "password_here" | passwd --stdin es_runtime

# 解压并分配目录归属权
tar -xzvf elasticsearch-7.14.0-linux-x86_64.tar.gz -C /opt/
chown -R es_runtime:es_runtime /opt/elasticsearch-7.14.0/
2. 系统参数优化
编辑 /etc/security/limits.conf,在末尾添加以下配置以防止因文件描述符不足导致进程退出:
es_runtime soft nofile 65536
es_runtime hard nofile 131072
es_runtime soft nproc 4096
es_runtime hard nproc 4096
3. 核心配置修改
编辑 /opt/elasticsearch-7.14.0/config/elasticsearch.yml,确保服务支持外部访问与跨域:
cluster.name: search-cluster
node.name: node-primary
network.host: 0.0.0.0
http.port: 9200
cluster.initial_master_nodes: ["node-primary"]

# 开启跨域支持,以便 Head 插件连接
http.cors.enabled: true
http.cors.allow-origin: "*"
4. 内存调节(可选)
若服务器资源有限,可修改 config/jvm.options 中的堆内存大小,例如设置为 1G:
-Xms1g
-Xmx1g
5. 服务启动与检查
su - es_runtime
cd /opt/elasticsearch-7.14.0/bin
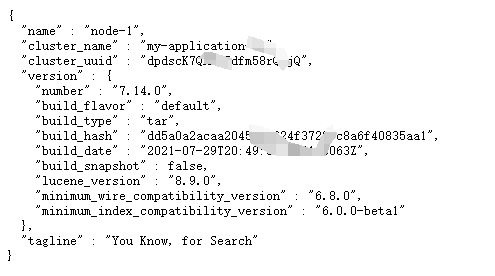
./elasticsearch -d访问 http://[服务器IP]:9200/,若返回 JSON 格式的状态信息,则表示启动成功。
三、 运行环境:安装 Node.js
ElasticSearch-Head 插件基于 Node.js 运行,这里使用 14.18.2 版本。
# 解压 Node 归档包
tar -xzvf node-v14.18.2-linux-x64.tar.gz -C /usr/local/

# 更新 PATH 变量
echo 'export PATH=/usr/local/node-v14.18.2-linux-x64/bin:$PATH' >> /etc/profile
source /etc/profile

# 安装加速工具 cnpm
npm install -g cnpm --registry=https://registry.npmmirror.com
四、 轻量化管理工具:ElasticSearch-Head
注意:请勿将 Head 插件代码放入 ES 的 plugins 目录,应独立存放。
# 解压并进入项目目录
unzip elasticsearch-head-master.zip -d /opt/
cd /opt/elasticsearch-head-master
# 安装依赖并后台启动
cnpm install
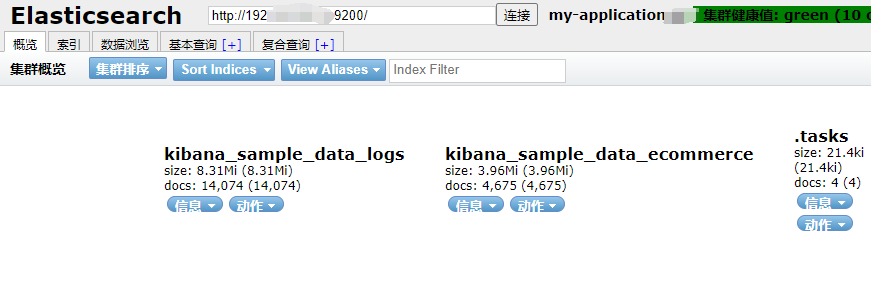
nohup npm run start &启动后,默认占用 9100 端口。通过浏览器访问该端口,并在连接地址栏输入 ES 的地址即可进行集群管理。
五、 数据可视化平台:Kibana 7.14.0
Kibana 提供了强大的数据探索与分析界面。
1. 解压与配置
tar -xzvf kibana-7.14.0-linux-x86_64.tar.gz -C /opt/
chown -R es_runtime:es_runtime /opt/kibana-7.14.0-linux-x86_64/
编辑 config/kibana.yml:
server.port: 5601
server.host: "0.0.0.0"
elasticsearch.hosts: ["http://localhost:9200"]
i18n.locale: "zh-CN" # 设置为中文界面
2. 启动 Kibana
su - es_runtime
cd /opt/kibana-7.14.0-linux-x86_64
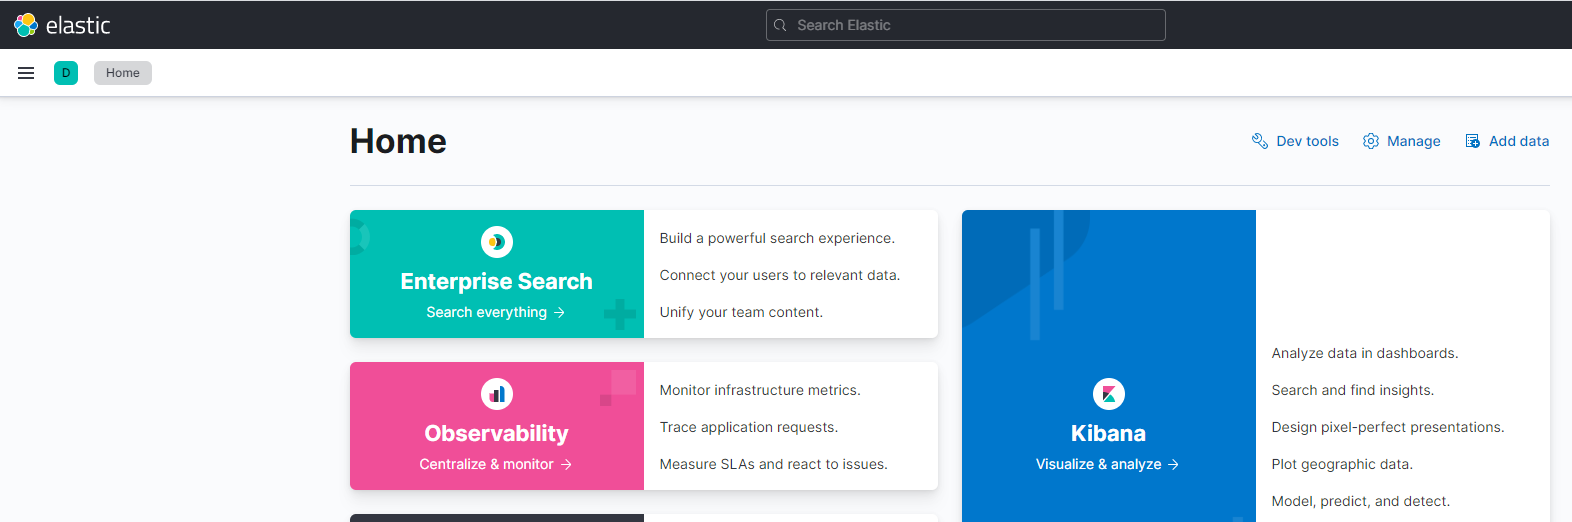
nohup ./bin/kibana &通过 http://[服务器IP]:5601 进入 Kibana 控制台。
六、 运维摘要:常用启停指令
确保以 es_runtime 用户身份执行相关服务命令:
- ElasticSearch:
/opt/elasticsearch-7.14.0/bin/elasticsearch -d - Kibana:
nohup /opt/kibana-7.14.0-linux-x86_64/bin/kibana & - Head 插件: 在项目目录下执行
nohup npm run start &
